Contents
Docs
General
- Introduction
- Android versions matrix
- What is Android Enterprise?
- Android Enterprise feature requests
- Considerations when migrating from device administrator to Android Enterprise
- Upgrading your Android Enterprise binding to a managed Google domain
- What is Android Enterprise Recommended?
- Android Enterprise FAQ
- How to migrate Android devices from one EMM to another
- Android Enterprise device testing
- What is Private Space in Android 15, and how can organisations manage it?
- Why don't all Android devices come with GMS?
- What is Android One?
- What are managed configurations?
- Android Enterprise vs Device Admin: Why DA is no longer suitable
- Considerations for choosing Android in the Enterprise
- Feature spotlight: Android Smartlock
- Android glossary
- Android version evolution graphics
- Infobyte: Device Admin deprecation
- How to submit a device for Android Enterprise Recommended validation
- How to view software version information
- How to capture a bug report and device logs
- Gartner comparison of security controls for mobile devices 2019
Provisioning
- How to become a zero-touch enrolment reseller
- Android Enterprise provisioning methods
- What is Android zero-touch enrolment?
- Android Enterprise zero-touch console administration guide
- Android Enterprise DPC identifier collection
- Android Enterprise provisioning guides
- Android Enterprise zero-touch DPC extras collection
- Infobyte: Android Enterprise deployment scenarios
- Infobyte: Android Enterprise fully managed provisioning methods
- Manual Android Enterprise work-managed QR code generation for MobileIron
Work profile
Fully managed
App management
- Set up Hypergate's Kerberos Authentication on MobileIron Core for Android Enterprise
- Managed Google Play, allowlist or blocklist?
- Considerations when deploying MTD with Android Enterprise
- Why you shouldn't install apps from unknown sources
- What is OEMConfig?
- Create and manage private apps for Android Enterprise
- Create and manage web apps for Android Enterprise
- Using Google Play application tracks with EMM
- How to locate a private Android app assigned to an organisation ID
- How to host enterprise apps outside of Google Play
- The Google Play iFrame app approval flow is deprecated
- Android 13 adds notifications access as a runtime permission
- Android 13 & up restricts permissions when apps are sideloaded
- Android 14 blocks apps targeting old Android versions
- Android minimum target SDK matrix
- Android system app database
- How to resolve common Android app install failures, by error message
FAQ
- Is Android Enterprise supported on uncertified (non-GMS) devices?
- Can apps be sideloaded into the Private Space?
- Is Private Space supported on fully managed devices?
- Why don't Private Space apps go through VPN?
- How can apps be managed in the Private Space?
- Are Private Space apps visible to enterprise admins?
- Are Private Space applications truly hidden?
- Does Samsung support Android Enterprise?
- Is it possible to manage personal applications on a work profile device?
- Why has USB data access been disabled suddenly?
- What versions of Android support Android Enterprise?
- How to check if an Android device is GMS/Play Protect certified?
- Is it possible to manage eSIM?
- Can I manage APNs through AMAPI?
- Why is my organisation name showing on managed devices?
- Can I route specific apps through 5G network slicing?
- To use Android Enterprise do I need to buy Google Workspace (G Suite) and register my domain?
- What is a managed Google domain, and should I upgrade?
- Is Android Enterprise supported on XR headsets?
- What devices should I buy for my organisation?
- What is the difference between GMS and EDLA certification for enterprise?
- How do Samsung Knox and Android Enterprise policies interact?
- If Android Enterprise is supported from Lollipop, why is Marshmallow often mentioned instead?
- What’s the difference between Device Admin and Android Enterprise?
- What is the Android Enterprise bind?
- Can I change the account I used to bind Android Enterprise?
- Is it possible to bind Android Enterprise with multiple EMMs using one account?
- How do I remove the Android Enterprise bind from my current EMM?
- How do I choose an EMM for Android Enterprise?
- What network requirements does Android Enterprise have?
- What is Android Enterprise Recommended?
- My AER device doesn’t work properly with Android Enterprise, what should I do?
- What is Advanced Protection, and can it be managed?
- Is Android One better than AER? (Or the other way around?)
- How do I configure Google Workspace domains for provisioning?
- What’s the best provisioning method?
- What’s the difference between allow adding accounts vs allow configure credentials?
- Is it possible to utilise multiple VPN connections within a profile?
- Is it possible to utilise a single VPN connection across the entire device?
- Does Android support Kerberos natively?
- What’s the difference between device based accounts and user based accounts?
- How do I manage the new notifications runtime permission in Android 13?
- Can organisations see applications outside of the work profile?
- What can my employer see on my personal device with a work profile?
- What happens to my data when the work profile is removed?
- What is the difference between MAM and work profiles for BYOD?
- Can organisations deploy applications to the parent profile in a work profile deployment?
- Why does the work profile drain my battery?
- Why are my work profile notifications delayed or missing?
- Is it possible to migrate from DA to AE work profile without a re-enrol?
- Can I turn off my work profile?
- What is a work challenge?
- Enrolment failed but the work profile was created. How do I remove it?
- Why can’t I install or uninstall apps on my managed device?
- How can I provision a fully managed device?
- Is it possible to “retire” (or enterprise wipe) a fully managed device?
- What is RCS archival, and which devices support it?
- Devices factory reset as soon as they’re enrolled, why?
- Is Factory Reset Protection enabled on fully managed devices?
- What is the difference between FRP and Enterprise FRP?
- Is it possible to migrate fully managed devices between EMM solutions?
- How has COPE changed in Android 11?
- Does Intune support COPE?
- Can organisations see applications outside of the work profile on a COPE device?
- Does Android Enterprise support Wear OS?
- Can organisations deploy applications to the parent profile in a COPE deployment?
- Is it possible to migrate from fully managed to COPE without a factory reset?
- How should system applications be handled on a COPE device?
- What OEMs currently support zero-touch?
- Where are zero-touch resellers located?
- Does zero-touch cost anything?
- Does Android Auto work on fully managed devices?
- Is an EMM still required with zero-touch?
- What is the content protection policy in AMAPI?
- What happens if a fully set up device is added to the zero-touch console?
- What happens if a user starts setting up a device before the zero-touch config is applied?
- What happens if a zero-touch config is removed from an enrolled device?
- My AMAPI project returns a usage limit error, why?
- Can I add/remove users on a fully managed device?
- What happens if a new config for a different EMM or server is applied to an enrolled device?
- How can I access a Wi-Fi captive portal when devices are in Kiosk?
- What happens if a zero-touch assigned device is reset?
- What is Device Trust from Android Enterprise?
- Why does zero-touch or KME not trigger after a factory reset on Android 15+?
- What happens if a device is unregistered from the zero-touch console?
- What enterprise features are new in Android 16?
- What is Identity Check on Android?
- Can a device be OTA managed from the zero-touch console?
- What happens when a managed device receives a major Android update?
- Can I migrate devices from a custom DPC to AMAPI?
- What enterprise features are new in Android 17?
- Avoiding configuration issues in Google Workspace with GEM & 3rd party EMM
- What is the difference between AMAPI and a custom DPC?
- Can I pin a specific OS or app version on managed devices?
- Does enrolling via zero-touch slow down or cause any delay to the setup process while it’s retrieving the zero-touch config?
- What happens if my Android Enterprise bind account is disabled or deleted?
- What is the AMAPI MCP server?
- How do I manage runtime permissions on managed Android devices?
- Can I manage Private DNS settings through AMAPI?
- What deployment scenario will a zero-touch device enrol under?
- Why does zero-touch require so much touching?
- Can I set Device Owner without a factory reset?
- Can anyone add a device to the zero-touch console?
- Is it possible for an organisation to add previously-purchased devices to zero-touch?
- Can a MADA device be converted to EDLA?
- Can anyone remove a device from the zero-touch console?
- Does Samsung support zero-touch?
- Is it possible to set a zero-touch default configuration?
- Is it possible to bulk update zero-touch devices?
- Is it possible to change zero-touch resellers?
- Are all zero-touch devices Android Enterprise Recommended?
- What are DPC extras?
- What should I put in DPC extras?
- How do I set up zero-touch enrollment when my device reseller is not a zero-touch partner?
- What happens if a device is uploaded to zero-touch with the wrong manufacturer?
- The device registered with zero-touch, but doesn’t launch during setup, why?
- Does Android Go support zero-touch?
- Why are my zero-touch devices randomly factory resetting?
- Are employee-owned devices eligible for zero-touch?
- How do I turn off Google Play app collections?
- What’s the recommended way of managing private (in-house) applications?
- Is it possible to deploy app shortcuts to the homescreen of an Android Enterprise device?
- What are AMAPI application roles?
- Is it possible to backup & restore device data on a fully managed device?
- What is Lost Mode on Android Enterprise?
- The Google Play iFrame is missing a feature in my UEM. How do I enable it?
- How do I configure allowlist/blocklist domains for Google Chrome?
- Does Picture-in-Picture work in kiosk (lock task) mode?
- How to configure Chrome managed bookmarks
- Why does Samsung Smart Switch not work on fully managed devices?
- Play Protect blocked my DPC, why?
- Can Google Play Protect remove apps from managed devices without admin approval?
- What is enhanced fraud protection, and can it block enterprise apps?
- Has Play Protect changed how it handles sideloaded apps on managed devices?
- What is Google Play developer verification, and how does it affect enterprise?
- What do Google Play's target API level requirements mean for enterprise?
- Does AMAPI support direct APK installation?
- Why can't I find apps in managed Google Play after approving them?
- Are Google Play System Updates managed by Android Enterprise system update policies?
- What enterprise features are new in Android 15?
- Can I purchase paid apps through managed Google Play?
- Can I control default applications through AMAPI?
- Why is my kiosk app UI broken after updating to Android 15?
- Why are managed Google Play apps stuck on pending?
- Why is work profile enrolment failing?
- How do app updates work in managed Google Play?
- Why don't managed configurations work with app tracks?
- How do I prevent users from escaping kiosk (lock task) mode?
- How do I manage credential providers and passkeys on managed devices?
- How does conditional access work with Android Enterprise?
- How does cross-profile data sharing work in a work profile?
- What are the AMAPI device quota limits?
- What is the key attestation root certificate change in 2026?
- Can I rename my managed Google Play organisation?
- How do I manage generative AI apps and features on managed devices?
Change log
Manual Android Enterprise work-managed QR code generation for MobileIron
Contents
This isn’t officially supported
#MobileIron only officially support QR codes generated through the MobileIron Provisioner app. While the below works and has been extensively tested, do not expect MobileIron to assist with the manual creation of QR codes outside of the official application!
How it works
#When taking a factory-reset device out of the box, the Android setup wizard presents a “Welcome” screen. While this can and does vary on exact wording and placement, normally tapping on the “Welcome” text or a similarly placed logo 6 times in the same place will invoke the QR setup process.
Once invoked, the device will request a Wi-Fi connection, perform a few initial checks, automatically download a QR reader and start it, ready to be presented with a QR code.
From there on the process is similar to that of the NFC and wireless token enrolment methods, with the setup wizard being largely skipped and the MobileIron agent instead presented for enrolment of the now work-managed device.
Prerequisites
#In order for QR code enrolment to work with Android Enterprise, the following is required:
- Android 7.0+ with QR code support. Notable exclusions are Huawei, in which QR support is only available in EMUI versions higher than EMUI 5.1
- MobileIron Core 9.2 or above, where Android Enterprise (then Android for Work) was introduced.
Validate the checksum
#This is no longer necessary
#In 2018 MobileIron switched from package checksum to admin signature checksum, meaning it’s no longer necessary to generate a package checksum unless you wish to do so for the sake of experimentation. The admin signature checksum will not need to be updated, and thus the MobileIron Core and Cloud code examples in the next section may be used as-is.
The below code requires an APK URL and checksum. While the URL is likely to remain the same, the checksum will change when the package is updated.
If the checksum fails, the device will prompt to perform a factory reset which adds a delay to provisioning. It may be possible to avoid this with a device reboot, however it’s always best to validate the checksum matches that of the APK before attempting to generate a QR code and provision devices.
To generate a checksum for a downloaded APK, with OpenSSL perform the following:
cat name-of-APK-latest.apk | openssl dgst -binary -sha256 | openssl base64 | tr '+/' '-_' | tr -d '='
To generate a checksum for the hosted APK (that is, via remote URL) CURL can be used instead:
curl -s https://support.mobileiron.com/android-client-nfc/mi/mi-android-nfc-latest.apk | openssl dgst -binary -sha256 | openssl base64 | tr '+/' '-_' | tr -d '='
This will now return a valid, SHA-256 checksum converted to URL-safe base64. An example checksum is as follows:
tlYEdUEZ3sUGJM-ySibMl0YjJXKDoUJOM1GxSSoVsrE
Replace ADMIN_SIGNATURE_CHECKSUM in the below code with the following to make package checksum work (making sure to add the actually generated checksum in place of the example):
"android.app.extra.PROVISIONING_DEVICE_ADMIN_PACKAGE_CHECKSUM":
"tlYEdUEZ3sUGJM-ySibMl0YjJXKDoUJOM1GxSSoVsrE",
MobileIron Core
#Use the following code for provisioning a device against MobileIron Core:
{
"android.app.extra.PROVISIONING_DEVICE_ADMIN_COMPONENT_NAME":
"com.mobileiron/com.mobileiron.receiver.MIDeviceAdmin",

"android.app.extra.PROVISIONING_DEVICE_ADMIN_SIGNATURE_CHECKSUM":
"xFg1LVfpb97Vq958bulXHYWpd4hmVOl2RU2ThGyktc0",

"android.app.extra.PROVISIONING_DEVICE_ADMIN_PACKAGE_DOWNLOAD_LOCATION":
"https://support.mobileiron.com/android-client-nfc/mi/mi-android-nfc-latest.apk",
"android.app.extra.PROVISIONING_SKIP_ENCRYPTION": false,

"android.app.extra.PROVISIONING_LEAVE_ALL_SYSTEM_APPS_ENABLED":false,

"android.app.extra.PROVISIONING_ADMIN_EXTRAS_BUNDLE": {
}
}
For more information about this raw code, read MobileIron unofficially supports QR provisioning for Android Enterprise work-managed devices, this is how I found it.
MobileIron Cloud
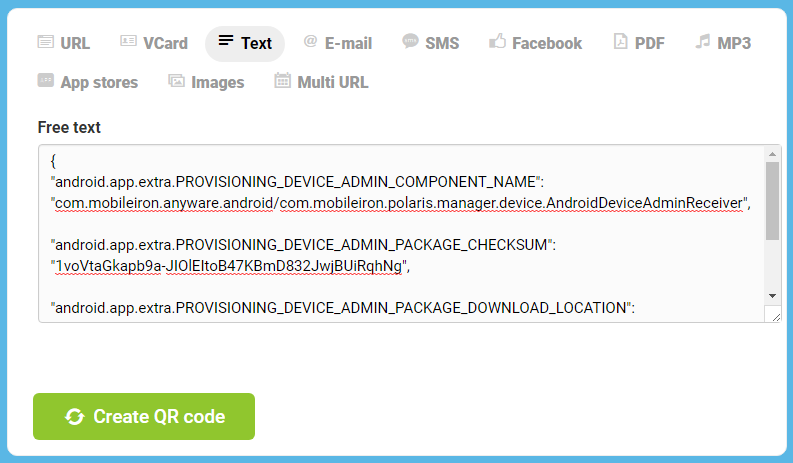
#Use the following code for provisioning a device against MobileIron Cloud:
{
"android.app.extra.PROVISIONING_DEVICE_ADMIN_COMPONENT_NAME":
"com.mobileiron.anyware.android/com.mobileiron.polaris.manager.device.AndroidDeviceAdminReceiver",

"android.app.extra.PROVISIONING_DEVICE_ADMIN_SIGNATURE_CHECKSUM":
"H2IxQHNSEQDujQ7aEQUzvl43Ngik_w9AGHExJhhWELE",

"android.app.extra.PROVISIONING_DEVICE_ADMIN_PACKAGE_DOWNLOAD_LOCATION":
"https://support.mobileiron.com/cloud-android/current/MobileIron-Go-latest.apk",
"android.app.extra.PROVISIONING_SKIP_ENCRYPTION": false,

"android.app.extra.PROVISIONING_LEAVE_ALL_SYSTEM_APPS_ENABLED":false,

"android.app.extra.PROVISIONING_ADMIN_EXTRAS_BUNDLE": {

}
}
For more information about this raw code, read MobileIron unofficially supports QR provisioning for Android Enterprise work-managed devices, this is how I found it.
DPC extras
#In the QR codes above, the following extras can also be used as follows:
"android.app.extra.PROVISIONING_ADMIN_EXTRAS_BUNDLE": {
"server":"your.server.com",
"user":"jason",
"quickStart":true
}
Generating the QR code
#No special tools are required for generating MobileIron-compatible QR codes. As long as the chosen QR generator supports free text, any can be used. For the codes generated in the linked post above I used qr-code-generator.com.
Docs
General
- Introduction
- Android versions matrix
- What is Android Enterprise?
- Android Enterprise feature requests
- Considerations when migrating from device administrator to Android Enterprise
- Upgrading your Android Enterprise binding to a managed Google domain
- What is Android Enterprise Recommended?
- Android Enterprise FAQ
- How to migrate Android devices from one EMM to another
- Android Enterprise device testing
- What is Private Space in Android 15, and how can organisations manage it?
- Why don't all Android devices come with GMS?
- What is Android One?
- What are managed configurations?
- Android Enterprise vs Device Admin: Why DA is no longer suitable
- Considerations for choosing Android in the Enterprise
- Feature spotlight: Android Smartlock
- Android glossary
- Android version evolution graphics
- Infobyte: Device Admin deprecation
- How to submit a device for Android Enterprise Recommended validation
- How to view software version information
- How to capture a bug report and device logs
- Gartner comparison of security controls for mobile devices 2019
Provisioning
- How to become a zero-touch enrolment reseller
- Android Enterprise provisioning methods
- What is Android zero-touch enrolment?
- Android Enterprise zero-touch console administration guide
- Android Enterprise DPC identifier collection
- Android Enterprise provisioning guides
- Android Enterprise zero-touch DPC extras collection
- Infobyte: Android Enterprise deployment scenarios
- Infobyte: Android Enterprise fully managed provisioning methods
- Manual Android Enterprise work-managed QR code generation for MobileIron
Work profile
Fully managed
App management
- Set up Hypergate's Kerberos Authentication on MobileIron Core for Android Enterprise
- Managed Google Play, allowlist or blocklist?
- Considerations when deploying MTD with Android Enterprise
- Why you shouldn't install apps from unknown sources
- What is OEMConfig?
- Create and manage private apps for Android Enterprise
- Create and manage web apps for Android Enterprise
- Using Google Play application tracks with EMM
- How to locate a private Android app assigned to an organisation ID
- How to host enterprise apps outside of Google Play
- The Google Play iFrame app approval flow is deprecated
- Android 13 adds notifications access as a runtime permission
- Android 13 & up restricts permissions when apps are sideloaded
- Android 14 blocks apps targeting old Android versions
- Android minimum target SDK matrix
- Android system app database
- How to resolve common Android app install failures, by error message
FAQ
- Is Android Enterprise supported on uncertified (non-GMS) devices?
- Can apps be sideloaded into the Private Space?
- Is Private Space supported on fully managed devices?
- Why don't Private Space apps go through VPN?
- How can apps be managed in the Private Space?
- Are Private Space apps visible to enterprise admins?
- Are Private Space applications truly hidden?
- Does Samsung support Android Enterprise?
- Is it possible to manage personal applications on a work profile device?
- Why has USB data access been disabled suddenly?
- What versions of Android support Android Enterprise?
- How to check if an Android device is GMS/Play Protect certified?
- Is it possible to manage eSIM?
- Can I manage APNs through AMAPI?
- Why is my organisation name showing on managed devices?
- Can I route specific apps through 5G network slicing?
- To use Android Enterprise do I need to buy Google Workspace (G Suite) and register my domain?
- What is a managed Google domain, and should I upgrade?
- Is Android Enterprise supported on XR headsets?
- What devices should I buy for my organisation?
- What is the difference between GMS and EDLA certification for enterprise?
- How do Samsung Knox and Android Enterprise policies interact?
- If Android Enterprise is supported from Lollipop, why is Marshmallow often mentioned instead?
- What’s the difference between Device Admin and Android Enterprise?
- What is the Android Enterprise bind?
- Can I change the account I used to bind Android Enterprise?
- Is it possible to bind Android Enterprise with multiple EMMs using one account?
- How do I remove the Android Enterprise bind from my current EMM?
- How do I choose an EMM for Android Enterprise?
- What network requirements does Android Enterprise have?
- What is Android Enterprise Recommended?
- My AER device doesn’t work properly with Android Enterprise, what should I do?
- What is Advanced Protection, and can it be managed?
- Is Android One better than AER? (Or the other way around?)
- How do I configure Google Workspace domains for provisioning?
- What’s the best provisioning method?
- What’s the difference between allow adding accounts vs allow configure credentials?
- Is it possible to utilise multiple VPN connections within a profile?
- Is it possible to utilise a single VPN connection across the entire device?
- Does Android support Kerberos natively?
- What’s the difference between device based accounts and user based accounts?
- How do I manage the new notifications runtime permission in Android 13?
- Can organisations see applications outside of the work profile?
- What can my employer see on my personal device with a work profile?
- What happens to my data when the work profile is removed?
- What is the difference between MAM and work profiles for BYOD?
- Can organisations deploy applications to the parent profile in a work profile deployment?
- Why does the work profile drain my battery?
- Why are my work profile notifications delayed or missing?
- Is it possible to migrate from DA to AE work profile without a re-enrol?
- Can I turn off my work profile?
- What is a work challenge?
- Enrolment failed but the work profile was created. How do I remove it?
- Why can’t I install or uninstall apps on my managed device?
- How can I provision a fully managed device?
- Is it possible to “retire” (or enterprise wipe) a fully managed device?
- What is RCS archival, and which devices support it?
- Devices factory reset as soon as they’re enrolled, why?
- Is Factory Reset Protection enabled on fully managed devices?
- What is the difference between FRP and Enterprise FRP?
- Is it possible to migrate fully managed devices between EMM solutions?
- How has COPE changed in Android 11?
- Does Intune support COPE?
- Can organisations see applications outside of the work profile on a COPE device?
- Does Android Enterprise support Wear OS?
- Can organisations deploy applications to the parent profile in a COPE deployment?
- Is it possible to migrate from fully managed to COPE without a factory reset?
- How should system applications be handled on a COPE device?
- What OEMs currently support zero-touch?
- Where are zero-touch resellers located?
- Does zero-touch cost anything?
- Does Android Auto work on fully managed devices?
- Is an EMM still required with zero-touch?
- What is the content protection policy in AMAPI?
- What happens if a fully set up device is added to the zero-touch console?
- What happens if a user starts setting up a device before the zero-touch config is applied?
- What happens if a zero-touch config is removed from an enrolled device?
- My AMAPI project returns a usage limit error, why?
- Can I add/remove users on a fully managed device?
- What happens if a new config for a different EMM or server is applied to an enrolled device?
- How can I access a Wi-Fi captive portal when devices are in Kiosk?
- What happens if a zero-touch assigned device is reset?
- What is Device Trust from Android Enterprise?
- Why does zero-touch or KME not trigger after a factory reset on Android 15+?
- What happens if a device is unregistered from the zero-touch console?
- What enterprise features are new in Android 16?
- What is Identity Check on Android?
- Can a device be OTA managed from the zero-touch console?
- What happens when a managed device receives a major Android update?
- Can I migrate devices from a custom DPC to AMAPI?
- What enterprise features are new in Android 17?
- Avoiding configuration issues in Google Workspace with GEM & 3rd party EMM
- What is the difference between AMAPI and a custom DPC?
- Can I pin a specific OS or app version on managed devices?
- Does enrolling via zero-touch slow down or cause any delay to the setup process while it’s retrieving the zero-touch config?
- What happens if my Android Enterprise bind account is disabled or deleted?
- What is the AMAPI MCP server?
- How do I manage runtime permissions on managed Android devices?
- Can I manage Private DNS settings through AMAPI?
- What deployment scenario will a zero-touch device enrol under?
- Why does zero-touch require so much touching?
- Can I set Device Owner without a factory reset?
- Can anyone add a device to the zero-touch console?
- Is it possible for an organisation to add previously-purchased devices to zero-touch?
- Can a MADA device be converted to EDLA?
- Can anyone remove a device from the zero-touch console?
- Does Samsung support zero-touch?
- Is it possible to set a zero-touch default configuration?
- Is it possible to bulk update zero-touch devices?
- Is it possible to change zero-touch resellers?
- Are all zero-touch devices Android Enterprise Recommended?
- What are DPC extras?
- What should I put in DPC extras?
- How do I set up zero-touch enrollment when my device reseller is not a zero-touch partner?
- What happens if a device is uploaded to zero-touch with the wrong manufacturer?
- The device registered with zero-touch, but doesn’t launch during setup, why?
- Does Android Go support zero-touch?
- Why are my zero-touch devices randomly factory resetting?
- Are employee-owned devices eligible for zero-touch?
- How do I turn off Google Play app collections?
- What’s the recommended way of managing private (in-house) applications?
- Is it possible to deploy app shortcuts to the homescreen of an Android Enterprise device?
- What are AMAPI application roles?
- Is it possible to backup & restore device data on a fully managed device?
- What is Lost Mode on Android Enterprise?
- The Google Play iFrame is missing a feature in my UEM. How do I enable it?
- How do I configure allowlist/blocklist domains for Google Chrome?
- Does Picture-in-Picture work in kiosk (lock task) mode?
- How to configure Chrome managed bookmarks
- Why does Samsung Smart Switch not work on fully managed devices?
- Play Protect blocked my DPC, why?
- Can Google Play Protect remove apps from managed devices without admin approval?
- What is enhanced fraud protection, and can it block enterprise apps?
- Has Play Protect changed how it handles sideloaded apps on managed devices?
- What is Google Play developer verification, and how does it affect enterprise?
- What do Google Play's target API level requirements mean for enterprise?
- Does AMAPI support direct APK installation?
- Why can't I find apps in managed Google Play after approving them?
- Are Google Play System Updates managed by Android Enterprise system update policies?
- What enterprise features are new in Android 15?
- Can I purchase paid apps through managed Google Play?
- Can I control default applications through AMAPI?
- Why is my kiosk app UI broken after updating to Android 15?
- Why are managed Google Play apps stuck on pending?
- Why is work profile enrolment failing?
- How do app updates work in managed Google Play?
- Why don't managed configurations work with app tracks?
- How do I prevent users from escaping kiosk (lock task) mode?
- How do I manage credential providers and passkeys on managed devices?
- How does conditional access work with Android Enterprise?
- How does cross-profile data sharing work in a work profile?
- What are the AMAPI device quota limits?
- What is the key attestation root certificate change in 2026?
- Can I rename my managed Google Play organisation?
- How do I manage generative AI apps and features on managed devices?