Contents
Docs
General
- Introduction
- Android versions matrix
- What is Android Enterprise?
- Android Enterprise feature requests
- Considerations when migrating from device administrator to Android Enterprise
- Upgrading your Android Enterprise binding to a managed Google domain
- What is Android Enterprise Recommended?
- Android Enterprise FAQ
- How to migrate Android devices from one EMM to another
- Android Enterprise device testing
- What is Private Space in Android 15, and how can organisations manage it?
- Why don't all Android devices come with GMS?
- What is Android One?
- What are managed configurations?
- Android Enterprise vs Device Admin: Why DA is no longer suitable
- Considerations for choosing Android in the Enterprise
- Feature spotlight: Android Smartlock
- Android glossary
- Android version evolution graphics
- Infobyte: Device Admin deprecation
- How to submit a device for Android Enterprise Recommended validation
- How to view software version information
- How to capture a bug report and device logs
- Gartner comparison of security controls for mobile devices 2019
Provisioning
- How to become a zero-touch enrolment reseller
- Android Enterprise provisioning methods
- What is Android zero-touch enrolment?
- Android Enterprise zero-touch console administration guide
- Android Enterprise DPC identifier collection
- Android Enterprise provisioning guides
- Android Enterprise zero-touch DPC extras collection
- Infobyte: Android Enterprise deployment scenarios
- Infobyte: Android Enterprise fully managed provisioning methods
- Manual Android Enterprise work-managed QR code generation for MobileIron
Work profile
Fully managed
App management
- Set up Hypergate's Kerberos Authentication on MobileIron Core for Android Enterprise
- Managed Google Play, allowlist or blocklist?
- Considerations when deploying MTD with Android Enterprise
- Why you shouldn't install apps from unknown sources
- What is OEMConfig?
- Create and manage private apps for Android Enterprise
- Create and manage web apps for Android Enterprise
- Using Google Play application tracks with EMM
- How to locate a private Android app assigned to an organisation ID
- How to host enterprise apps outside of Google Play
- The Google Play iFrame app approval flow is deprecated
- Android 13 adds notifications access as a runtime permission
- Android 13 & up restricts permissions when apps are sideloaded
- Android 14 blocks apps targeting old Android versions
- Android minimum target SDK matrix
- Android system app database
- How to resolve common Android app install failures, by error message
FAQ
- Is Android Enterprise supported on uncertified (non-GMS) devices?
- Can apps be sideloaded into the Private Space?
- Is Private Space supported on fully managed devices?
- Why don't Private Space apps go through VPN?
- How can apps be managed in the Private Space?
- Are Private Space apps visible to enterprise admins?
- Are Private Space applications truly hidden?
- Does Samsung support Android Enterprise?
- Is it possible to manage personal applications on a work profile device?
- Why has USB data access been disabled suddenly?
- What versions of Android support Android Enterprise?
- How to check if an Android device is GMS/Play Protect certified?
- Is it possible to manage eSIM?
- Can I manage APNs through AMAPI?
- Why is my organisation name showing on managed devices?
- Can I route specific apps through 5G network slicing?
- To use Android Enterprise do I need to buy Google Workspace (G Suite) and register my domain?
- What is a managed Google domain, and should I upgrade?
- Is Android Enterprise supported on XR headsets?
- What devices should I buy for my organisation?
- What is the difference between GMS and EDLA certification for enterprise?
- How do Samsung Knox and Android Enterprise policies interact?
- If Android Enterprise is supported from Lollipop, why is Marshmallow often mentioned instead?
- What’s the difference between Device Admin and Android Enterprise?
- What is the Android Enterprise bind?
- Can I change the account I used to bind Android Enterprise?
- Is it possible to bind Android Enterprise with multiple EMMs using one account?
- How do I remove the Android Enterprise bind from my current EMM?
- How do I choose an EMM for Android Enterprise?
- What network requirements does Android Enterprise have?
- What is Android Enterprise Recommended?
- My AER device doesn’t work properly with Android Enterprise, what should I do?
- What is Advanced Protection, and can it be managed?
- Is Android One better than AER? (Or the other way around?)
- How do I configure Google Workspace domains for provisioning?
- What’s the best provisioning method?
- What’s the difference between allow adding accounts vs allow configure credentials?
- Is it possible to utilise multiple VPN connections within a profile?
- Is it possible to utilise a single VPN connection across the entire device?
- Does Android support Kerberos natively?
- What’s the difference between device based accounts and user based accounts?
- How do I manage the new notifications runtime permission in Android 13?
- Can organisations see applications outside of the work profile?
- What can my employer see on my personal device with a work profile?
- What happens to my data when the work profile is removed?
- What is the difference between MAM and work profiles for BYOD?
- Can organisations deploy applications to the parent profile in a work profile deployment?
- Why does the work profile drain my battery?
- Why are my work profile notifications delayed or missing?
- Is it possible to migrate from DA to AE work profile without a re-enrol?
- Can I turn off my work profile?
- What is a work challenge?
- Enrolment failed but the work profile was created. How do I remove it?
- Why can’t I install or uninstall apps on my managed device?
- How can I provision a fully managed device?
- Is it possible to “retire” (or enterprise wipe) a fully managed device?
- What is RCS archival, and which devices support it?
- Devices factory reset as soon as they’re enrolled, why?
- Is Factory Reset Protection enabled on fully managed devices?
- What is the difference between FRP and Enterprise FRP?
- Is it possible to migrate fully managed devices between EMM solutions?
- How has COPE changed in Android 11?
- Does Intune support COPE?
- Can organisations see applications outside of the work profile on a COPE device?
- Does Android Enterprise support Wear OS?
- Can organisations deploy applications to the parent profile in a COPE deployment?
- Is it possible to migrate from fully managed to COPE without a factory reset?
- How should system applications be handled on a COPE device?
- What OEMs currently support zero-touch?
- Where are zero-touch resellers located?
- Does zero-touch cost anything?
- Does Android Auto work on fully managed devices?
- Is an EMM still required with zero-touch?
- What is the content protection policy in AMAPI?
- What happens if a fully set up device is added to the zero-touch console?
- What happens if a user starts setting up a device before the zero-touch config is applied?
- What happens if a zero-touch config is removed from an enrolled device?
- My AMAPI project returns a usage limit error, why?
- Can I add/remove users on a fully managed device?
- What happens if a new config for a different EMM or server is applied to an enrolled device?
- How can I access a Wi-Fi captive portal when devices are in Kiosk?
- What happens if a zero-touch assigned device is reset?
- What is Device Trust from Android Enterprise?
- Why does zero-touch or KME not trigger after a factory reset on Android 15+?
- What happens if a device is unregistered from the zero-touch console?
- What enterprise features are new in Android 16?
- What is Identity Check on Android?
- Can a device be OTA managed from the zero-touch console?
- What happens when a managed device receives a major Android update?
- Can I migrate devices from a custom DPC to AMAPI?
- What enterprise features are new in Android 17?
- Avoiding configuration issues in Google Workspace with GEM & 3rd party EMM
- What is the difference between AMAPI and a custom DPC?
- Can I pin a specific OS or app version on managed devices?
- Does enrolling via zero-touch slow down or cause any delay to the setup process while it’s retrieving the zero-touch config?
- What happens if my Android Enterprise bind account is disabled or deleted?
- What is the AMAPI MCP server?
- How do I manage runtime permissions on managed Android devices?
- Can I manage Private DNS settings through AMAPI?
- What deployment scenario will a zero-touch device enrol under?
- Why does zero-touch require so much touching?
- Can I set Device Owner without a factory reset?
- Can anyone add a device to the zero-touch console?
- Is it possible for an organisation to add previously-purchased devices to zero-touch?
- Can a MADA device be converted to EDLA?
- Can anyone remove a device from the zero-touch console?
- Does Samsung support zero-touch?
- Is it possible to set a zero-touch default configuration?
- Is it possible to bulk update zero-touch devices?
- Is it possible to change zero-touch resellers?
- Are all zero-touch devices Android Enterprise Recommended?
- What are DPC extras?
- What should I put in DPC extras?
- How do I set up zero-touch enrollment when my device reseller is not a zero-touch partner?
- What happens if a device is uploaded to zero-touch with the wrong manufacturer?
- The device registered with zero-touch, but doesn’t launch during setup, why?
- Does Android Go support zero-touch?
- Why are my zero-touch devices randomly factory resetting?
- Are employee-owned devices eligible for zero-touch?
- How do I turn off Google Play app collections?
- What’s the recommended way of managing private (in-house) applications?
- Is it possible to deploy app shortcuts to the homescreen of an Android Enterprise device?
- What are AMAPI application roles?
- Is it possible to backup & restore device data on a fully managed device?
- What is Lost Mode on Android Enterprise?
- The Google Play iFrame is missing a feature in my UEM. How do I enable it?
- How do I configure allowlist/blocklist domains for Google Chrome?
- Does Picture-in-Picture work in kiosk (lock task) mode?
- How to configure Chrome managed bookmarks
- Why does Samsung Smart Switch not work on fully managed devices?
- Play Protect blocked my DPC, why?
- Can Google Play Protect remove apps from managed devices without admin approval?
- What is enhanced fraud protection, and can it block enterprise apps?
- Has Play Protect changed how it handles sideloaded apps on managed devices?
- What is Google Play developer verification, and how does it affect enterprise?
- What do Google Play's target API level requirements mean for enterprise?
- Does AMAPI support direct APK installation?
- Why can't I find apps in managed Google Play after approving them?
- Are Google Play System Updates managed by Android Enterprise system update policies?
- What enterprise features are new in Android 15?
- Can I purchase paid apps through managed Google Play?
- Can I control default applications through AMAPI?
- Why is my kiosk app UI broken after updating to Android 15?
- Why are managed Google Play apps stuck on pending?
- Why is work profile enrolment failing?
- How do app updates work in managed Google Play?
- Why don't managed configurations work with app tracks?
- How do I prevent users from escaping kiosk (lock task) mode?
- How do I manage credential providers and passkeys on managed devices?
- How does conditional access work with Android Enterprise?
- How does cross-profile data sharing work in a work profile?
- What are the AMAPI device quota limits?
- What is the key attestation root certificate change in 2026?
- Can I rename my managed Google Play organisation?
- How do I manage generative AI apps and features on managed devices?
Change log
Deploying an ElasticSearch 2.x cluster on Ubuntu 16.04 LTS
Contents
1. What is Elasticsearch?
#Elasticsearch is a free, open source, distributed search engine based on Apache Lucene. Elasticsearch boasts being able to take the overwhelming complexity of Lucene and present it in a simple to use, cross-platform product providing communication through a REST API over HTTP.
Elasticsearch integrates with various solutions to provide in-depth search, analysis and manipulation of data.
1.1. Why a cluster?
#As a standalone server Elasticsearch will work well in smaller or development environments. For production environments however for improved stability, scalability and performance a cluster is very much recommended. As demand grows, adding additional servers is simple and straightforward.
2. The environment
#2.1. Hardware
#Before getting started, note that the resources used in this guide are vastly lower than those recommended by Elastic for running ElasticSearch in production. Although CPU is less of a concern for ElasticSearch, memory is very important; on production environments at least 8GB of RAM is recommended, preferably 16GB or even 32GB due to the potential workloads of the ElasticSearch cluster. Similarly, plenty of SSD or 15K drive storage is also recommended.
As the following takes place in a lab environment, the cluster will see nothing near a workload requiring that amount of resource. Before deploying a production cluster however, please read and follow the ElasticSearch minimum hardware guide here.
For this guide, I’ll be using three Ubuntu 16.04 LTS servers in a master-data-data configuration. This type of setup scales well for performance, but it is not resilient to failure. In order to provide redundancy there should be at least two master servers; adding an additional master is documented at 5.4.
The guide will equally work for 14.04 LTS and it doesn’t matter whether you use physical servers, VMs or containers, as long as they each have a dedicated IP address and can communicate on a private (v)LAN.
2.2. Launching servers in a hosted environment
#Hosted setup is demonstrated on ElasticHosts as they kindly provide me with a hosted environment with which to do guides on public infrastructure. If you have servers setup already with dedicated IPs and a private network, skip this step. Alternatively if you’d like to use LXD, skip to 3.4. below.
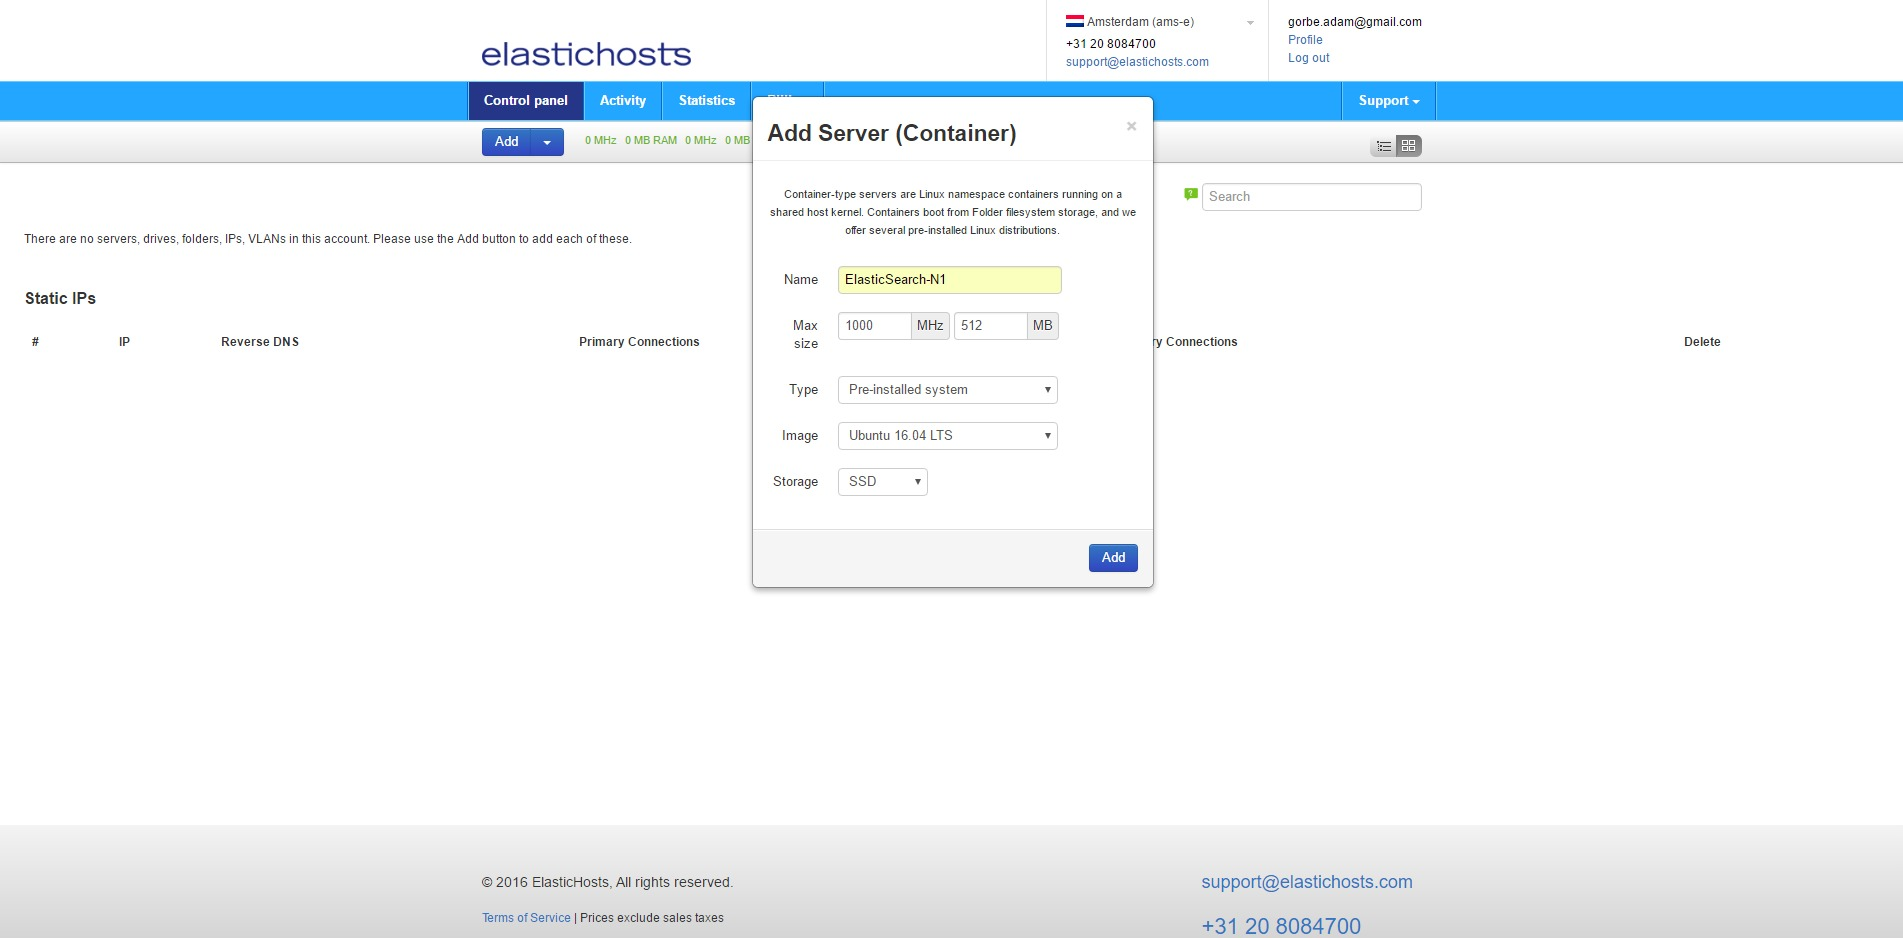
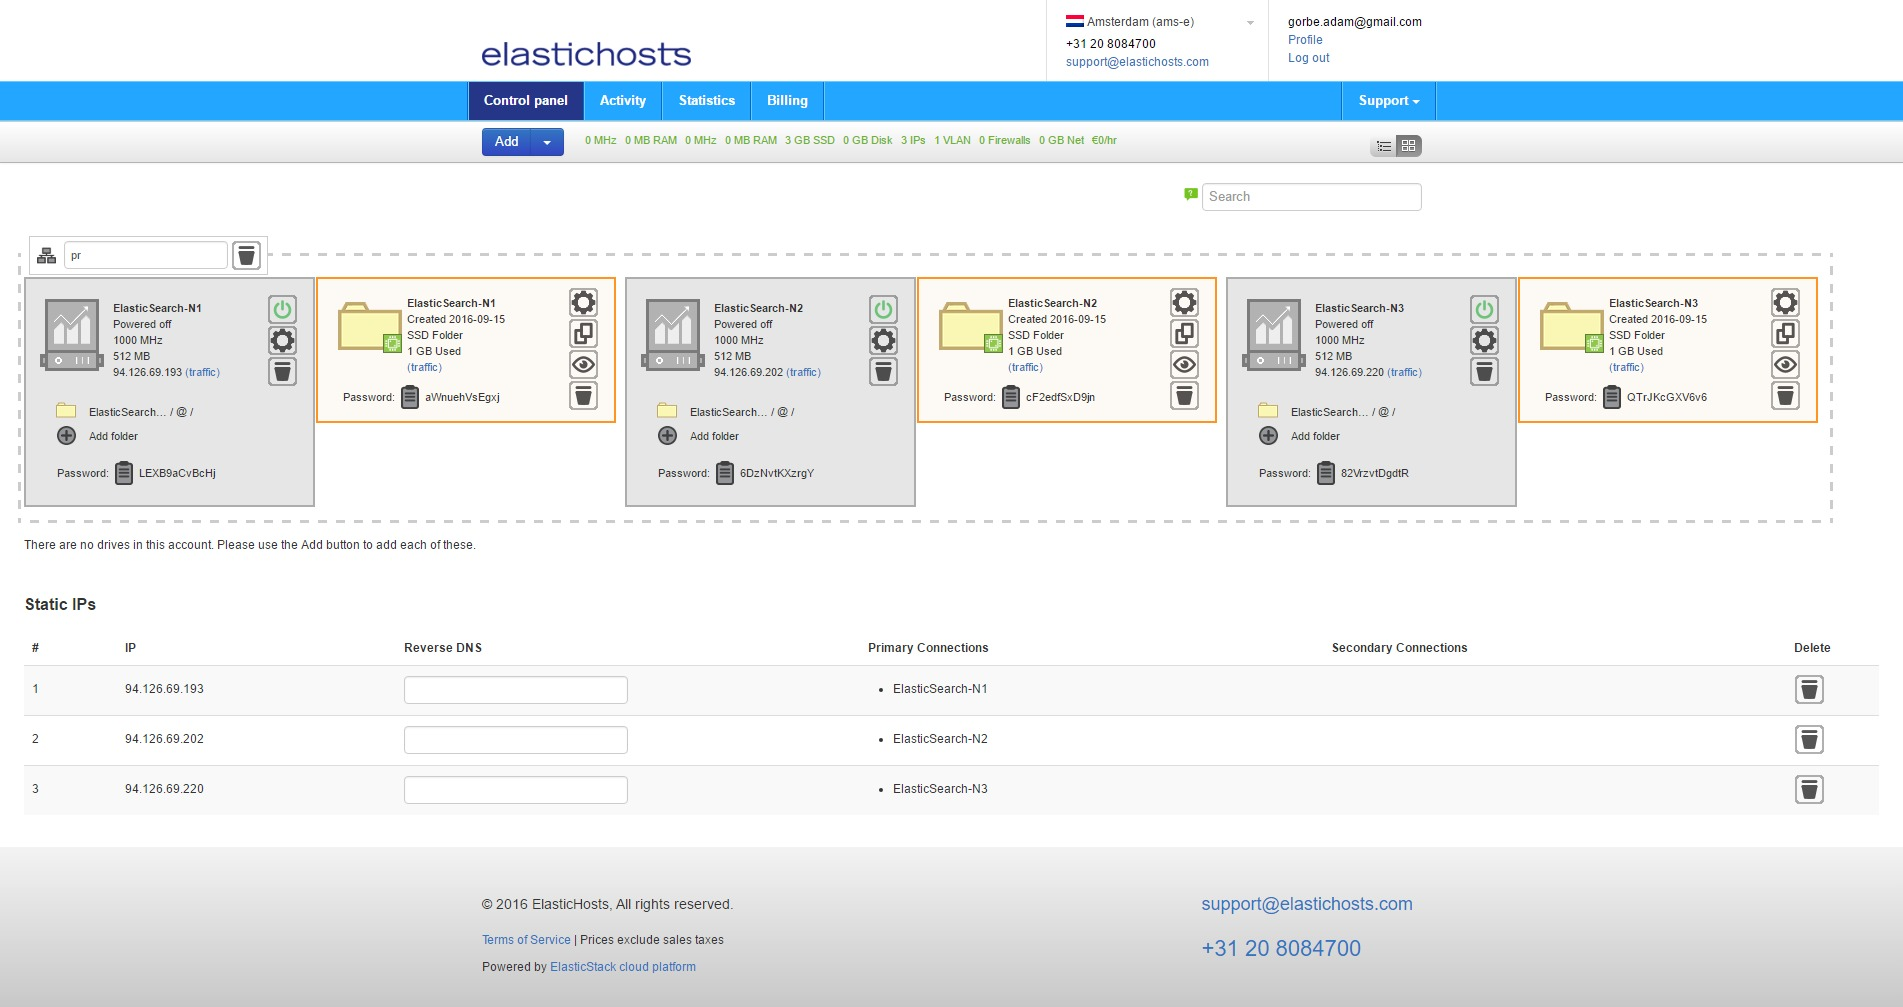
From the ElasticHosts admin console, create three new containers: ElasticSearch-N1, ElasticSearch-N2 and ElasticSearch-N3. To do so, click Add then Server under Linux Containers.
Next, create 3 static IP addresses to avoid DNS issues should the containers get rebooted and acquire different IP addresses from the DHCP pool. From Add select Static IP. Do this 3 times to get 3 addresses.
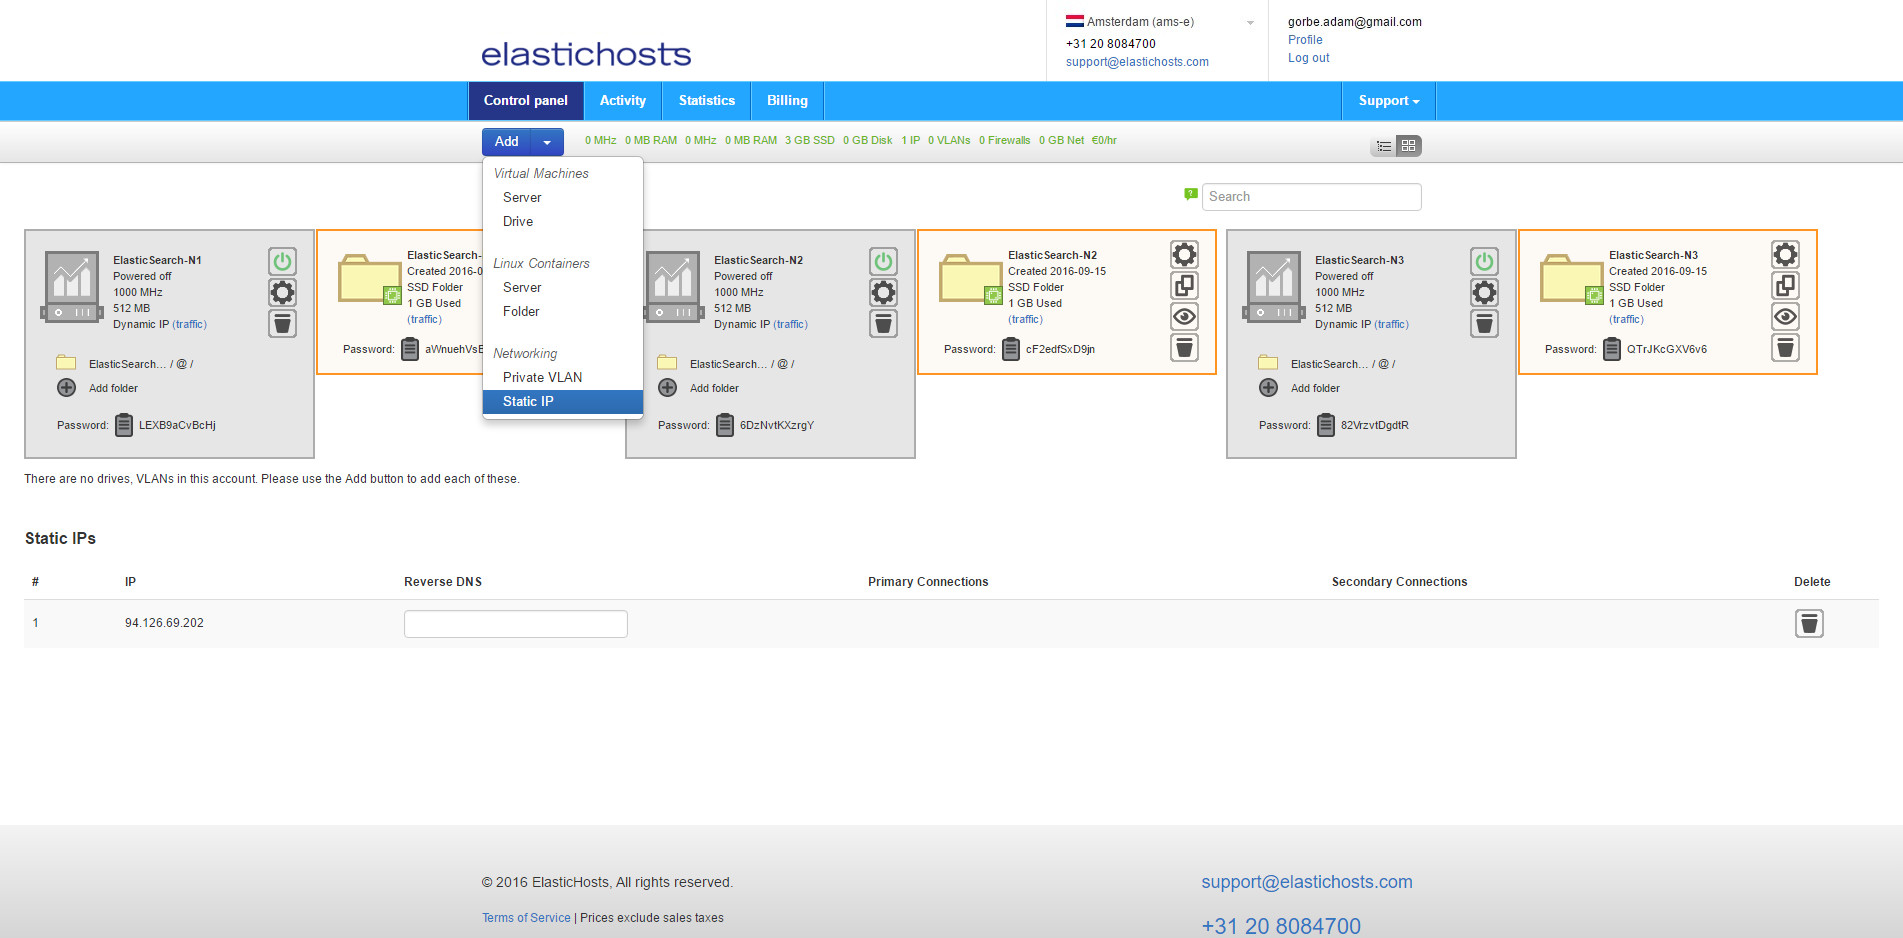
Static IP addresses are listed at the bottom of the admin console.
To allow the containers to easily communicate internally we can also create a private VLAN by clicking Add and selecting Private VLAN.
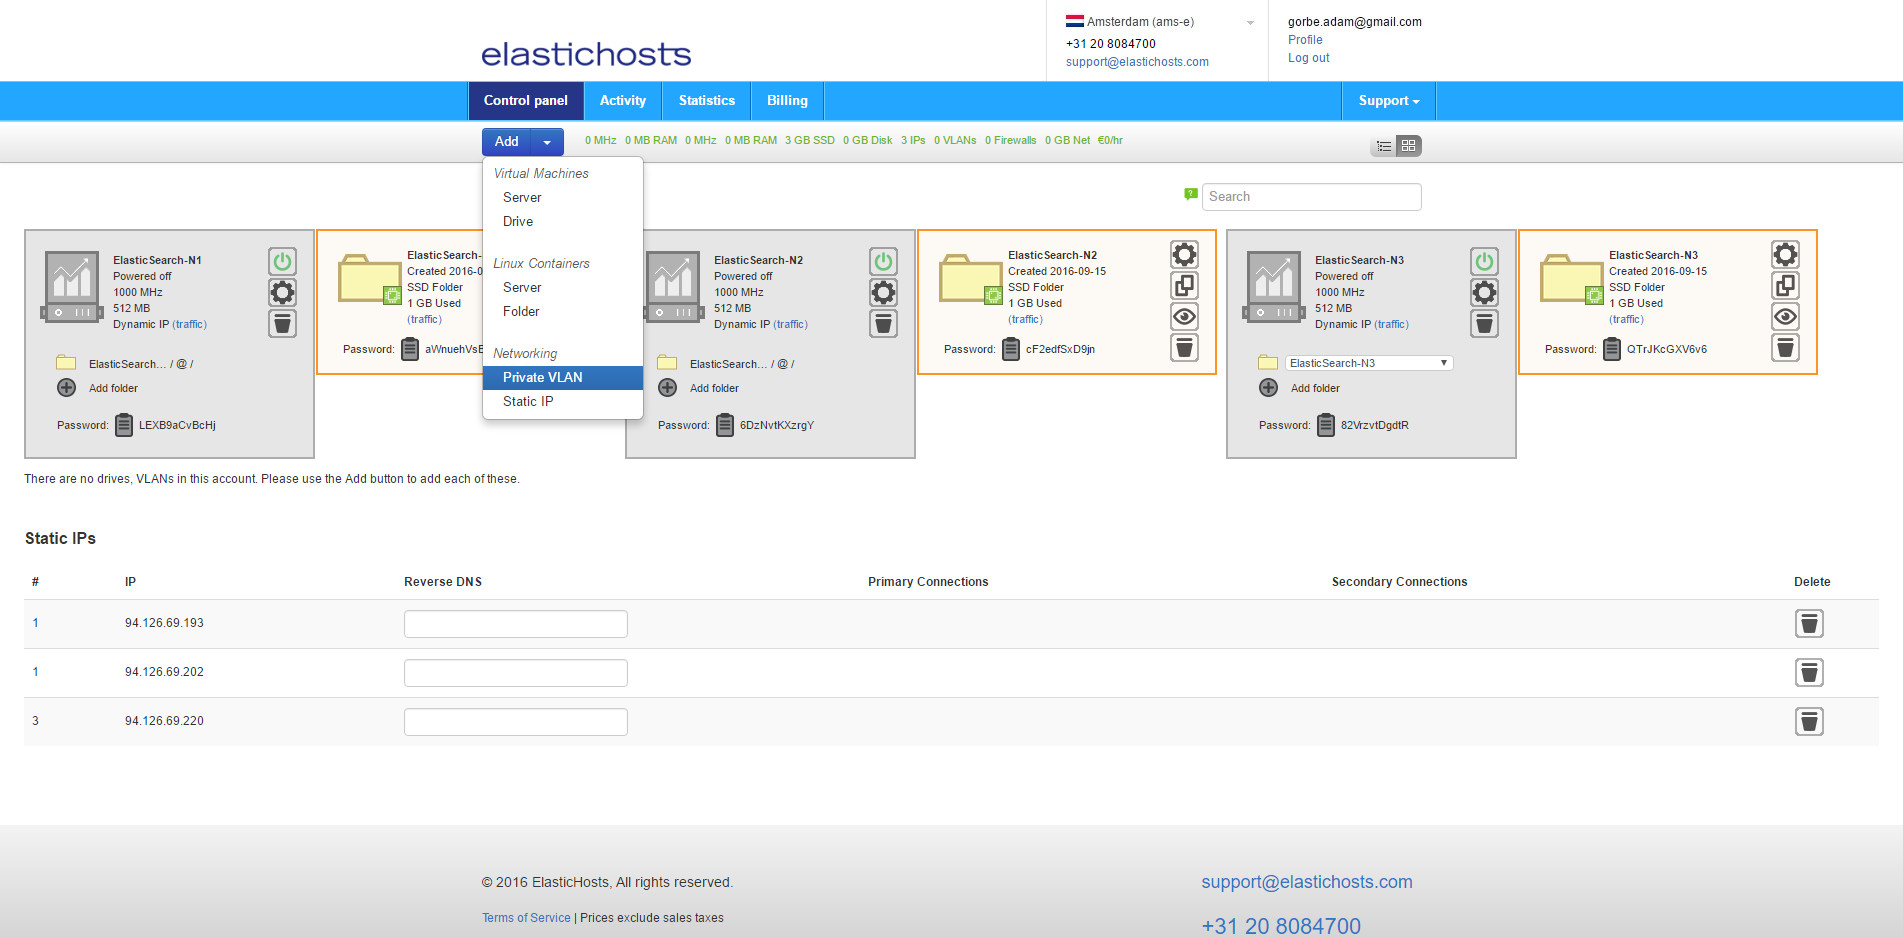
Finally, before starting the containers for the first time, assign the IPs and VLAN to the containers. If we were just to edit the IP we could click Dynamic IP on the container in order to select any available IP, but as we’re also assigning a VLAN we need to click the cog icon to enter the server settings.
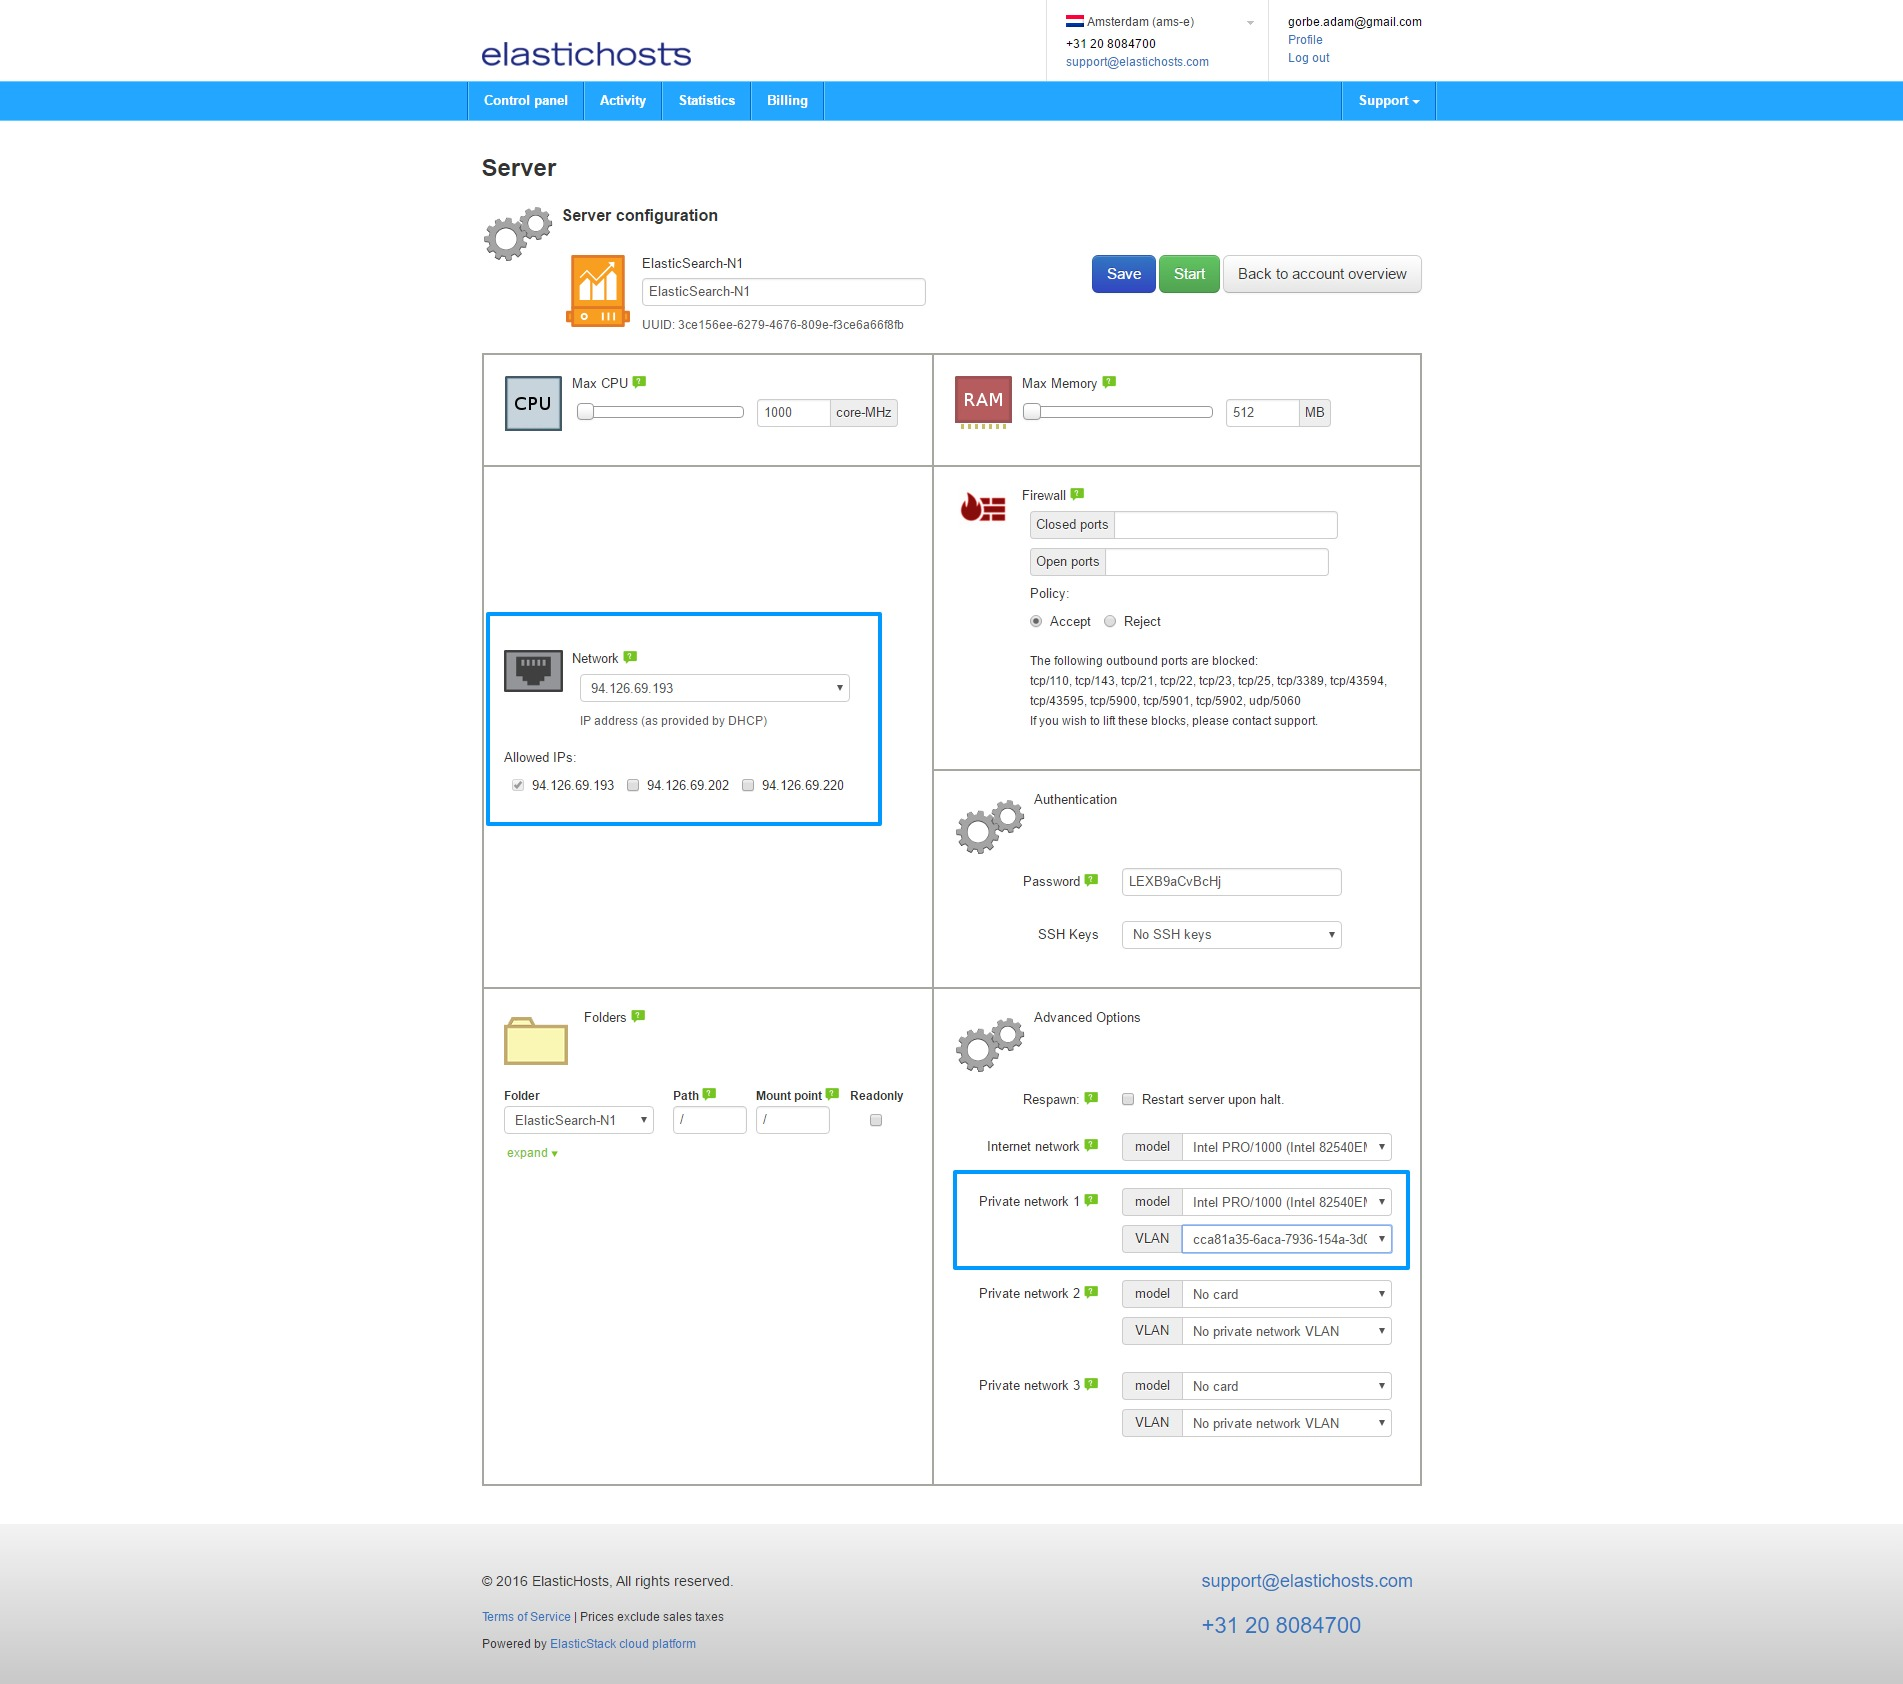
As highlighted in blue, select a newly created IP on the upper left, and assign the VLAN to an Intel PRO/1000 NIC on the lower right. Do this for all three containers and we’ll end up with them bundled together under the VLAN, each with their own static IP. At this point in time this is only dealing with the one NIC, the second internal IP will be configured shortly.
All three containers can now be started. Skip LXD setup below and move on to server configuration and installation of ElasticSearch.
2.3. Deploying servers on LXD
#If you have servers setup already with dedicated IPs and a private network, skip this step. If you haven’t yet set up LXD, follow my guide.
By default LXD will either supply IP addresses via its own lxdbr0 bridge, or alternatively can be configured to receive them from the LAN DHCP server; in these cases to keep the Elasticsearch servers private, simply don’t NAT to them from the external firewall or configure forwarding via iptables on the LXD host. If LXD is configured in such a way that all containers have a public IP address, continue to 3.3.1. once the containers are created.
To create the three required LXD containers, run:
lxc launch ubuntu:x elasticsearch-n1
lxc launch ubuntu:x elasticsearch-n2
lxc launch ubuntu:x elasticsearch-n3
This will create the containers from the Ubuntu image repository, where :x stands for Xenial (16.04). If the containers will require a VLAN, use init instead of launch so that the containers will not automatically start just yet.
2.3.1. LXD host VLAN setup
#To create a new private VLAN for LXD, ensure bridge-utils is installed on the LXD host and add the following to /etc/network/interfaces under the existing ifaces:
auto <strong>br1</strong>
iface <strong>br1</strong> inet static
     address <b>10.11.12.1</b>
     netmask <strong>255.255.255.0</strong>
     bridge_ports none
The items in bold can be changed at will, though make a note of them for later. Once saved, bring the interface up with:
sudo ifup br1
With the host now configured, let’s create a new profile to add to the containers in order to provide them with an additional NIC for use with the VLAN:
lxc profile create <strong>nics</strong> && lxc profile edit <strong>nics</strong>
This will create a profile named nics (of course it can be named anything) and bring up an editor. Find the devices section, remove the curly brackets ( { } ) and ensure the relevant section looks as follows:
name: nics
config: {}
description: ""
devices:
  eth1:
    name: eth1
    nictype: bridged
    parent: br1
    type: nic
When complete, Ctrl + X to save, then Y to apply.
Now add both this and the default profile to each container. The default profile is already applied, however unless both default and the new profile are applied together, the default profile gets removed:
lxc profile apply elasticsearch-n1 default,nics
Feel free to now start the three containers with the lxc start command, for example:
lxc start elasticsearch-n1
3. Preparation and installation
#The following steps will need to be undertaken on all three containers except where stated.
3.1. Connect to the server
#After starting the servers, use the default login method to connect to them; for LXD this would be from the LXD host:
lxc exec elasticsearch-n1 bash
For VPS nodes use an SSH client to connect. In the case of ElasticHosts’ auto-generated toor user and password, it’d look like this (for ElasticSearch-N1 as an example):
ssh toor@94.196.69.193 with the password LEXB9aCvBcHj
Disable the root account
#As soon as it’s convenient to do so, disable the root/toor account from logging in over SSH. A quick, simple way to do this in Ubuntu is to disable the account as follows from a different sudo-enabled account (which would need to be created first):
sudo passwd root -l
Furthermore, consider switching from password to key authentication as soon as possible. LXD containers are key-authenticated by default.
NB: All commands below this alert will be targeted towards a non-root sudo user account.
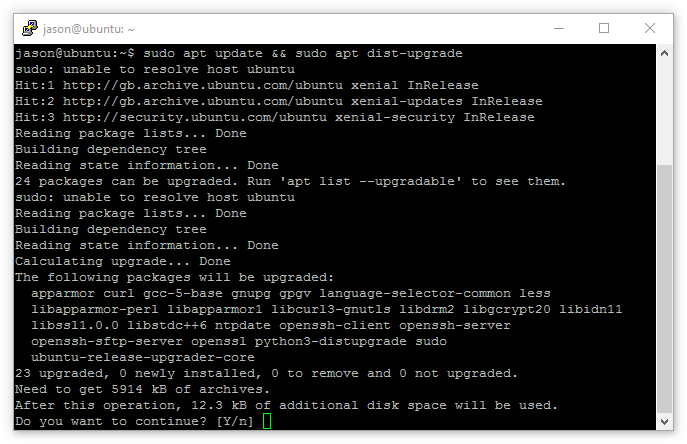
After logging in, let’s ensure the servers are up to date with:
sudo apt update && sudo apt dist-upgrade
The server will now show any packages needing to be updated. If that’s OK, hit enter to complete the update process:
3.2. Server VLAN setup
#Earlier all three containers were added to a private VLAN, now it can be set up.
First, check the NIC is present with:
ifconfig -a
This should return something similar to the below:
eth0 Link encap:Ethernet HWaddr ee:27:5a:2c:7f:68
inet addr:94.196.69.193 Bcast:5.152.178.255 Mask:255.255.255.0
inet6 addr: fe80::ec27:5aff:fe2c:7f68/64 Scope:Link
UP BROADCAST RUNNING MULTICAST MTU:1500 Metric:1
RX packets:19450 errors:0 dropped:0 overruns:0 frame:0
TX packets:9514 errors:0 dropped:0 overruns:0 carrier:0
collisions:0 txqueuelen:1000
RX bytes:218803196 (218.8 MB) TX bytes:1000777 (1.0 MB)

eth1 Link encap:Ethernet HWaddr f2:27:5a:2c:7f:68
BROADCAST MULTICAST MTU:1500 Metric:1
RX packets:9 errors:0 dropped:0 overruns:0 frame:0
TX packets:17 errors:0 dropped:0 overruns:0 carrier:0
collisions:0 txqueuelen:0
RX bytes:714 (714.0 B) TX bytes:1362 (1.3 KB)
eth1 is the NIC that needs to be edited in this case, and that can be done by running:
sudo vim /etc/network/interfaces (Using LXD, this will likely be /etc/network/interfaces.d/50-cloud-init.cfg)
Now add the new private network interface configuration under the existing eth0:
auto eth0
iface eth0 inet dhcp

<strong>auto eth1</strong>
<strong>iface eth1 inet static</strong>
    <strong> address 10.11.12.10</strong>
    <strong> netmask 255.255.255.0</strong>
    <strong> network 10.11.12.0</strong>
The bold entry above is what needs to be added to all three servers, where <strong>address 10.11.12.10</strong> may be any IP range, as long as each server has a different IP on one universal subnet (e.g.: 10.11.12.10, 10.11.12.11, 10.11.12.12)
Finally, run:
ifup eth1
And now it should be possible to ping all servers in the cluster from each node:
jason@ubuntu:~# ping 10.11.12.11
PING 10.11.12.11 (10.11.12.11) 56(84) bytes of data.
64 bytes from 10.11.12.11: icmp_seq=1 ttl=64 time=0.048 ms
64 bytes from 10.11.12.11: icmp_seq=2 ttl=64 time=0.036 ms
3.3. Install Java
#Elasticsearch requires the latest version of Java. For LXD I had issues with OpenJDK, so recommend the official Oracle Java package documented further down. NB: You need only to install one of the below Java packages, not both.
3.3.1. OpenJDK
#The latest version of OpenJDK JRE is 9 and as Elastic recommends the latest version, that’s what will be installed.
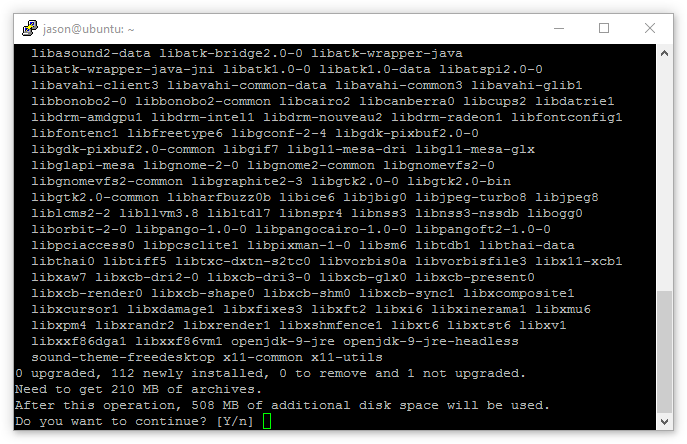
Install the OpenJDK Java Runtime Environment with:
sudo apt install openjdk-9-jre
Note: As shown in the screenshot below, Java and its dependencies can consume a lot of space. The installation will take a while.
When complete, verify the installation by running:
java -version
This should return an output similar to the below:
openjdk version "9-internal"
OpenJDK Runtime Environment (build 9-internal+0-2016-04-14-195246.buildd.src)
OpenJDK 64-Bit Server VM (build 9-internal+0-2016-04-14-195246.buildd.src, mixed mode)
NB: There is no need to do anything more with Java. Although there are many, many configuration options available for the Java VM, it’s advised by Elastic to not make any changes as this can negatively impact Elasticsearch.
3.3.2. Oracle Java
#First let’s add the Oracle apt repository to the servers:
sudo add-apt-repository ppa:webupd8team/java
There will be a prompt to continue with the installation of the new repo, tap enter to confirm, then:
sudo apt update
And finally install Java with:
sudo apt install oracle-java9-installer
When complete, verify the installation by running:
java -version
This should return an output similar to the below:
java version "9-ea"
Java(TM) SE Runtime Environment (build 9-ea+134)
Java HotSpot(TM) 64-Bit Server VM (build 9-ea+134, mixed mode)
NB: There is no need to do anything more with Java. Although there are many, many configuration options available for the Java VM, it’s advised by Elastic to not make any changes as this can negatively impact Elasticsearch.
3.4. Install Elasticsearch
#With Java installed let’s now begin the installation of Elasticsearch. For this guide the repository method will be used as this will allow easier upgrades across point versions (though will need to be edited for major releases, explained below).
Add the apt repository with:
wget -qO - https://packages.elastic.co/GPG-KEY-elasticsearch | sudo apt-key add -
echo "deb https://packages.elastic.co/elasticsearch/2.x/debian stable main" | sudo tee -a /etc/apt/sources.list.d/elasticsearch-2.x.list
Looking at the command above, Elastic explicitly state 2.x in their sources list. To avoid issues cross-installing packages of different versions they chose to separate their sources lists into a list for each major version. This means when version 5 is released later, the newly-configured apt list at /etc/apt/sources.list.d/elasticsearch-2.x.list will need to be updated.
With the repository added, let’s install Elasticsearch:
sudo apt update && sudo apt install elasticsearch
To finalise installation, ensure Elasticsearch starts automatically on boot with:
sudo update-rc.d elasticsearch defaults 95 10 for init.d systems (like the 16.04.1 image on ElasticHosts)
sudo /bin/systemctl daemon-reload && sudo /bin/systemctl enable elasticsearch.service for systemd systems
3.5. Configure Elasticsearch
#By default, all three installations will act and feel like single, independent nodes. The next step is to add them all to the same cluster group and provide distinguishable names. Open the Elasticsearch config file for editing:
sudo vim /etc/elasticsearch/elasticsearch.yml
The lines cluster.name: and node.name: will be commented out (#), so remove the comment and edit the lines as below:

Naturally node.name: needs to be different for all 3 servers. Notice also the additional line node.data: false – this is used on the master server as it doesn’t need to store data with two data nodes already doing so.
Furthermore, on the data nodes replace the line node.data: false with node.master: false. This tells the two data node servers that they are, indeed, data nodes and shouldn’t attempt to act as masters:

Now the servers know where they stand as masters and data nodes, let’s make it as easy as possible for them to run initial discovery. It’s possible for the master and data nodes to find each other, but on unicast networks (and the fact there are really no network services on the eth1 private range) there’s no harm in giving the servers a hand.
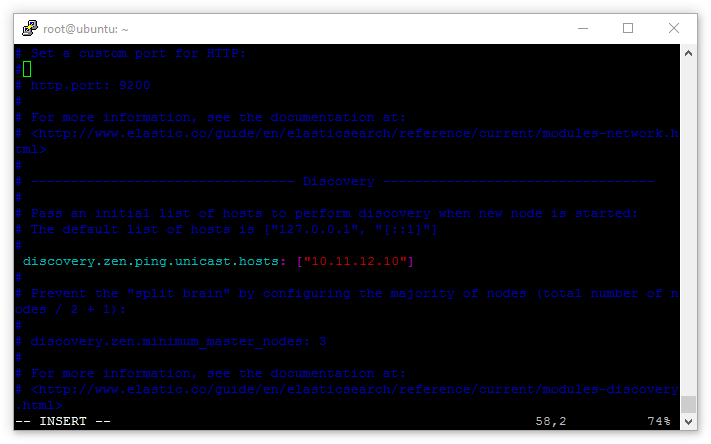
Find the entry: discovery.zen.ping.unicast.hosts: ["host1", "host2"] and uncomment it.
Again, as there are no network services (such as DNS, DHCP, etc) on the private range, the name-based “host1” example won’t work. These need to be replaced with the IP of the master:
discovery.zen.ping.unicast.hosts: ["10.11.12.10"]
Finally let’s lock the Elasticsearch cluster down to only allow requests from the private IP range, this will ensure only servers explicitly granted access to the private network can interact with the Elasticsearch API.
Find the line network.host: in the config file, replace it with network.bind_host: and add [_eth1_, _local_] to it:
network.bind_host: [_eth1_, _local_]
Then underneath add:
network.publish_host: _eth1_
This will prevent the cluster from receiving requests outside of the private IP range, but as it’s being locked it down to one interface, the _local_ entry allows the servers to retain access to loopback. Naturally, the cluster being locked down in this way means any servers that should be able to talk to the Elasticsearch cluster must also be on the private IP range, either as a member of the VLAN or through a VPN. The latter requiring the setup of a VPN server which isn’t in scope for this guide.
With the configuration now complete, start Elasticsearch on all three servers:
sudo service elasticsearch start
From any of the three Elasticsearch servers, running this command to print the state of the cluster:
curl -XGET 'http://localhost:9200/_cluster/state?pretty'
Will result in an output like this:
jason@ubuntu:~# curl -XGET 'http://localhost:9200/_cluster/state?pretty'
{
  "cluster_name" : "elasticcluster",
  "version" : 4,
  "state_uuid" : "SADkVG8eQZqbYMjN-cBFTA",
  "master_node" : "2Ptb02RQSk2nGIuU40kzpQ",
  "blocks" : { },
  "nodes" : {
    "2Ptb02RQSk2nGIuU40kzpQ" : {
      "name" : "elasticsearch-n1",
      "transport_address" : "10.11.12.1:9300",
      "attributes" : {
        "data" : "false"
      }
    },
    "QPmr9acjTL6w0L2o7bSiJA" : {
      "name" : "elasticsearch-n3",
      "transport_address" : "10.11.12.3:9300",
      "attributes" : {
        "master" : "false"
      }
    },
    "qaS5mhhYRa6PqWmikxxBLQ" : {
      "name" : "elasticsearch-n2",
      "transport_address" : "10.11.12.2:9300",
      "attributes" : {
        "master" : "false"
      }
    }
  },
  "metadata" : {
    "cluster_uuid" : "jItZbafWQKezl02uX2rNDg",
    "templates" : { },
    "indices" : { }
  },
  "routing_table" : {
    "indices" : { }
  },
  "routing_nodes" : {
    "unassigned" : [ ],
    "nodes" : {
      "qaS5mhhYRa6PqWmikxxBLQ" : [ ],
      "QPmr9acjTL6w0L2o7bSiJA" : [ ]
    }
  }
}
Success! All three servers are clustered properly and working together.
4. Using Elasticsearch
#With the cluster now up and ready to work, let’s test a few basic examples of inputting and extracting data from Elasticsearch. This can be done based on the documentation provided by Elastic as follows:
4.1. Create an index
#Without an index there’s nowhere for Elasticsearch to store data. It’s easy to create as many indices as required; if the contents of 1,000 websites needed to be indexed for example, 1,000 indices can be created and interrogated as individual data sources without ever worrying about mixing that data up.
Create two indices for “customer” and “client” with:
curl -XPUT 'localhost:9200/customer?pretty' && curl -XPUT 'localhost:9200/client?pretty'
For each request the server should provide a response like:
{
  "acknowledged" : true
}
And on checking what indices now exist:
curl 'localhost:9200/_cat/indices?v'
Shows the following:
jason@ubuntu:~$ curl 'localhost:9200/_cat/indices?v'
health status index    pri rep docs.count docs.deleted store.size pri.store.size
green  open   client     5   1          0            0      1.2kb           650b
green  open   customer   5   1          0            0      1.5kb           795b
This tells us there are two indices, and as replication is already set up and configured by creating the cluster the health status is green.
4.2. Add data
#With the indices set up, let’s now add data to them. Within each index it’s possible to define a “type”, so for a customer you could have types based on location: UK, Spain, Canada. Add a customer named “Jason” to the “UK” type in the “Customer” index as follows:
curl -XPUT 'localhost:9200/customer/uk/1?pretty' -d '
{
  "name": "Jason", "age": 27, "occupation": "self employed", "bonus-points": 1455
}'
In the above example Elasticsearch has been told the customer is named Jason, is 27 years old, is self-employed and has 1455 bonus (loyalty) points. The data input here doesn’t need to follow any templates – as long as all customers added are done so with the same information made up here (ie, all are consistent), Elasticsearch will keep it all together and indexed. If another customer is added with different fields, like “favourite food”, this would naturally only affect the results for one customer when later searching for customers with a favourite food. The results of the command are as follows:
{
  "_index" : "customer",
  "_type" : "uk",
  "_id" : "1",
  "_version" : 1,
  "_shards" : {
    "total" : 2,
    "successful" : 2,
    "failed" : 0
  },
  "created" : true
}
Then to see the record once again:
curl -XGET 'localhost:9200/customer/uk/1?pretty'
Which outputs:
{
  "_index" : "customer",
  "_type" : "uk",
  "_id" : "1",
  "_version" : 1,
  "found" : true,
  "_source" : {
    "name" : "Jason",
    "age" : 27,
    "occupation" : "self employed",
    "bonus-points" : 1455
  }
}
4.3. Searching for data
#Great, so it’s easy to add a record and view that record at any point in time. But what about all customer records? Let’s use the search function as follows:
curl 'localhost:9200/customer/_search?q=*&pretty'
This tells Elasticsearch to return all customer records, independent of record type. The output is as shown below:
{
  "took" : 70,
  "timed_out" : false,
  "_shards" : {
    "total" : 5,
    "successful" : 5,
    "failed" : 0
  },
  "hits" : {
    "total" : 3,
    "max_score" : 1.0,
    "hits" : [ {
      "_index" : "customer",
      "_type" : "uk",
      "_id" : "2",
      "_score" : 1.0,
      "_source" : {
        "name" : "Rob",
        "age" : 43,
        "occupation" : "chef",
        "bonus-points" : 14
      }
    }, {
      "_index" : "customer",
      "_type" : "uk",
      "_id" : "1",
      "_score" : 1.0,
      "_source" : {
        "name" : "Jason",
        "age" : 27,
        "occupation" : "self employed",
        "bonus-points" : 1455
      }
    }, {
      "_index" : "customer",
      "_type" : "uk",
      "_id" : "3",
      "_score" : 1.0,
      "_source" : {
        "name" : "Gemma",
        "age" : 19,
        "occupation" : "PA",
        "bonus-points" : 12334
      }
    } ]
  }
}
But how about only trying to find self-employed customers? Let’s search on the occupation field:
curl -XPOST 'localhost:9200/customer/_search?pretty' -d '
{
    "query": { "match": { "occupation": "self employed" } }
}'
And get the relevant results:
{
  "took" : 7,
  "timed_out" : false,
  "_shards" : {
    "total" : 5,
    "successful" : 5,
    "failed" : 0
  },
  "hits" : {
    "total" : 2,
    "max_score" : 0.8838835,
    "hits" : [ {
      "_index" : "customer",
      "_type" : "spain",
      "_id" : "4",
      "_score" : 0.8838835,
      "_source" : {
        "name" : "Maureen",
        "age" : 79,
        "occupation" : "self employed",
        "bonus-points" : 4
      }
    }, {
      "_index" : "customer",
      "_type" : "uk",
      "_id" : "1",
      "_score" : 0.2712221,
      "_source" : {
        "name" : "Jason",
        "age" : 27,
        "occupation" : "self employed",
        "bonus-points" : 1455
      }
    } ]
  }
}
Unfortunately, there appears to be a customer from Spain in there too, so to ensure only UK customers are returned, let’s whittle our search down to the UK type:
curl -XPOST 'localhost:9200/customer/<strong>uk</strong>/_search?pretty' -d '
{
  "query": { "match": { "occupation": "self employed" } }
}'
Which outputs just the self-employed customers in the UK:
{
  "took" : 18,
  "timed_out" : false,
  "_shards" : {
    "total" : 5,
    "successful" : 5,
    "failed" : 0
  },
  "hits" : {
    "total" : 1,
    "max_score" : 0.2712221,
    "hits" : [ {
      "_index" : "customer",
      "_type" : "uk",
      "_id" : "1",
      "_score" : 0.2712221,
      "_source" : {
        "name" : "Jason",
        "age" : 27,
        "occupation" : "self employed",
        "bonus-points" : 1455
      }
    } ]
  }
}
5. Adding more nodes
#Should you need to add more nodes to the cluster in the future, it’s relatively straight forward:
5.1. Manually
#Simply follow this guide from the beginning, ensuring the new server is added as a data node. Then:
- stop the Elasticsearch service on the cluster nodes,
- start the new server up and reconfigure the Elasticsearch config file (node name, data node status, etc),
- add a new VLAN IP address,
- restart the Elasticsearch service on all nodes.
5.2. LXD
#Stop the Elasticsearch service on all nodes in the cluster. Take an existing data node server, shut it down and clone it with:
lxc copy elasticsearch-n2 elasticsearch-n4
Then:
- start it up and reconfigure the Elasticsearch config file (node name),
- edit the VLAN IP address,
- restart the Elasticsearch service on all nodes.
5.3. Hosted environments with clone support
#Taking ElasticHosts as an example, stop the Elasticsearch service on all nodes, shut a data node server down and simply click the “drive copy” button on the control panel to get a replica of an original, then:
- create a new server without an image,
- assign the cloned drive,
- connect it to the VLAN,
- assign a new static IP,
- start it up and reconfigure the Elasticsearch config file (node name),
- add a new VLAN IP address,
- restart the Elasticsearch service on all nodes.
After restarting the Elasticsearch service it will be ready to go. With the vertical auto-scaling capability of containers as well, the cluster can handle more complex queries without having to create new servers vs traditional VPS instances.
5.4. Additional master nodes (redundancy)
#To add redundancy to an Elasticsearch cluster – that is if one master fails the cluster will continue to function – adding additional master nodes is both quick and easy.
Stop the Elasticsearch service on all nodes and shut the existing master down, then:
- Clone the master using any of the methods above,
- start it up and reconfigure the Elasticsearch config file (node name),
- edit the entry
discovery.zen.ping.unicast.hostson all nodes to add the new IP address, - optionally edit
discovery.zen.minimum_master_nodeson all master nodes (details below), - edit the VLAN IP address,
- restart the Elasticsearch service on all nodes.
For redundancy it’s a good idea to create 3 master servers. As the cluster grows this can be expanded, though it’s recommended to keep the number of masters uneven to ensure a split-brain situation can’t occur. In the Elasticsearch config file for all three master nodes set:
discovery.zen.minimum_master_nodes: 2
Why three masters? When considering redundancy, if there were two masters and one failed the setting above would result in the cluster failing; it requires at least two masters to be present and in the case of a single master failure this would not be the case.
With three masters should one fail there will still be two, enough for Elasticsearch to run as a cluster without the fear of the split-brain issue cropping up.
6. Conclusion
#So there we have it; an Elasticsearch cluster running across three Ubuntu 16.04 servers all working together in unison. For every query made against the indices, the same results are returned on all three servers. Magical!
Following this guide you should have spun up three Ubuntu containers, installed Java, installed and configured Elasticsearch and proven it’s working as intended.
Naturally what we’ve done today doesn’t even scratch the surface of the capabilities of this software, Elasticsearch is so versatile and has so many uses that many can’t even explain exactly what it is and does! If you’ve set up Elasticsearch for your own test or production environments, feel free to let me know what you’re doing with it in the comments.
Docs
General
- Introduction
- Android versions matrix
- What is Android Enterprise?
- Android Enterprise feature requests
- Considerations when migrating from device administrator to Android Enterprise
- Upgrading your Android Enterprise binding to a managed Google domain
- What is Android Enterprise Recommended?
- Android Enterprise FAQ
- How to migrate Android devices from one EMM to another
- Android Enterprise device testing
- What is Private Space in Android 15, and how can organisations manage it?
- Why don't all Android devices come with GMS?
- What is Android One?
- What are managed configurations?
- Android Enterprise vs Device Admin: Why DA is no longer suitable
- Considerations for choosing Android in the Enterprise
- Feature spotlight: Android Smartlock
- Android glossary
- Android version evolution graphics
- Infobyte: Device Admin deprecation
- How to submit a device for Android Enterprise Recommended validation
- How to view software version information
- How to capture a bug report and device logs
- Gartner comparison of security controls for mobile devices 2019
Provisioning
- How to become a zero-touch enrolment reseller
- Android Enterprise provisioning methods
- What is Android zero-touch enrolment?
- Android Enterprise zero-touch console administration guide
- Android Enterprise DPC identifier collection
- Android Enterprise provisioning guides
- Android Enterprise zero-touch DPC extras collection
- Infobyte: Android Enterprise deployment scenarios
- Infobyte: Android Enterprise fully managed provisioning methods
- Manual Android Enterprise work-managed QR code generation for MobileIron
Work profile
Fully managed
App management
- Set up Hypergate's Kerberos Authentication on MobileIron Core for Android Enterprise
- Managed Google Play, allowlist or blocklist?
- Considerations when deploying MTD with Android Enterprise
- Why you shouldn't install apps from unknown sources
- What is OEMConfig?
- Create and manage private apps for Android Enterprise
- Create and manage web apps for Android Enterprise
- Using Google Play application tracks with EMM
- How to locate a private Android app assigned to an organisation ID
- How to host enterprise apps outside of Google Play
- The Google Play iFrame app approval flow is deprecated
- Android 13 adds notifications access as a runtime permission
- Android 13 & up restricts permissions when apps are sideloaded
- Android 14 blocks apps targeting old Android versions
- Android minimum target SDK matrix
- Android system app database
- How to resolve common Android app install failures, by error message
FAQ
- Is Android Enterprise supported on uncertified (non-GMS) devices?
- Can apps be sideloaded into the Private Space?
- Is Private Space supported on fully managed devices?
- Why don't Private Space apps go through VPN?
- How can apps be managed in the Private Space?
- Are Private Space apps visible to enterprise admins?
- Are Private Space applications truly hidden?
- Does Samsung support Android Enterprise?
- Is it possible to manage personal applications on a work profile device?
- Why has USB data access been disabled suddenly?
- What versions of Android support Android Enterprise?
- How to check if an Android device is GMS/Play Protect certified?
- Is it possible to manage eSIM?
- Can I manage APNs through AMAPI?
- Why is my organisation name showing on managed devices?
- Can I route specific apps through 5G network slicing?
- To use Android Enterprise do I need to buy Google Workspace (G Suite) and register my domain?
- What is a managed Google domain, and should I upgrade?
- Is Android Enterprise supported on XR headsets?
- What devices should I buy for my organisation?
- What is the difference between GMS and EDLA certification for enterprise?
- How do Samsung Knox and Android Enterprise policies interact?
- If Android Enterprise is supported from Lollipop, why is Marshmallow often mentioned instead?
- What’s the difference between Device Admin and Android Enterprise?
- What is the Android Enterprise bind?
- Can I change the account I used to bind Android Enterprise?
- Is it possible to bind Android Enterprise with multiple EMMs using one account?
- How do I remove the Android Enterprise bind from my current EMM?
- How do I choose an EMM for Android Enterprise?
- What network requirements does Android Enterprise have?
- What is Android Enterprise Recommended?
- My AER device doesn’t work properly with Android Enterprise, what should I do?
- What is Advanced Protection, and can it be managed?
- Is Android One better than AER? (Or the other way around?)
- How do I configure Google Workspace domains for provisioning?
- What’s the best provisioning method?
- What’s the difference between allow adding accounts vs allow configure credentials?
- Is it possible to utilise multiple VPN connections within a profile?
- Is it possible to utilise a single VPN connection across the entire device?
- Does Android support Kerberos natively?
- What’s the difference between device based accounts and user based accounts?
- How do I manage the new notifications runtime permission in Android 13?
- Can organisations see applications outside of the work profile?
- What can my employer see on my personal device with a work profile?
- What happens to my data when the work profile is removed?
- What is the difference between MAM and work profiles for BYOD?
- Can organisations deploy applications to the parent profile in a work profile deployment?
- Why does the work profile drain my battery?
- Why are my work profile notifications delayed or missing?
- Is it possible to migrate from DA to AE work profile without a re-enrol?
- Can I turn off my work profile?
- What is a work challenge?
- Enrolment failed but the work profile was created. How do I remove it?
- Why can’t I install or uninstall apps on my managed device?
- How can I provision a fully managed device?
- Is it possible to “retire” (or enterprise wipe) a fully managed device?
- What is RCS archival, and which devices support it?
- Devices factory reset as soon as they’re enrolled, why?
- Is Factory Reset Protection enabled on fully managed devices?
- What is the difference between FRP and Enterprise FRP?
- Is it possible to migrate fully managed devices between EMM solutions?
- How has COPE changed in Android 11?
- Does Intune support COPE?
- Can organisations see applications outside of the work profile on a COPE device?
- Does Android Enterprise support Wear OS?
- Can organisations deploy applications to the parent profile in a COPE deployment?
- Is it possible to migrate from fully managed to COPE without a factory reset?
- How should system applications be handled on a COPE device?
- What OEMs currently support zero-touch?
- Where are zero-touch resellers located?
- Does zero-touch cost anything?
- Does Android Auto work on fully managed devices?
- Is an EMM still required with zero-touch?
- What is the content protection policy in AMAPI?
- What happens if a fully set up device is added to the zero-touch console?
- What happens if a user starts setting up a device before the zero-touch config is applied?
- What happens if a zero-touch config is removed from an enrolled device?
- My AMAPI project returns a usage limit error, why?
- Can I add/remove users on a fully managed device?
- What happens if a new config for a different EMM or server is applied to an enrolled device?
- How can I access a Wi-Fi captive portal when devices are in Kiosk?
- What happens if a zero-touch assigned device is reset?
- What is Device Trust from Android Enterprise?
- Why does zero-touch or KME not trigger after a factory reset on Android 15+?
- What happens if a device is unregistered from the zero-touch console?
- What enterprise features are new in Android 16?
- What is Identity Check on Android?
- Can a device be OTA managed from the zero-touch console?
- What happens when a managed device receives a major Android update?
- Can I migrate devices from a custom DPC to AMAPI?
- What enterprise features are new in Android 17?
- Avoiding configuration issues in Google Workspace with GEM & 3rd party EMM
- What is the difference between AMAPI and a custom DPC?
- Can I pin a specific OS or app version on managed devices?
- Does enrolling via zero-touch slow down or cause any delay to the setup process while it’s retrieving the zero-touch config?
- What happens if my Android Enterprise bind account is disabled or deleted?
- What is the AMAPI MCP server?
- How do I manage runtime permissions on managed Android devices?
- Can I manage Private DNS settings through AMAPI?
- What deployment scenario will a zero-touch device enrol under?
- Why does zero-touch require so much touching?
- Can I set Device Owner without a factory reset?
- Can anyone add a device to the zero-touch console?
- Is it possible for an organisation to add previously-purchased devices to zero-touch?
- Can a MADA device be converted to EDLA?
- Can anyone remove a device from the zero-touch console?
- Does Samsung support zero-touch?
- Is it possible to set a zero-touch default configuration?
- Is it possible to bulk update zero-touch devices?
- Is it possible to change zero-touch resellers?
- Are all zero-touch devices Android Enterprise Recommended?
- What are DPC extras?
- What should I put in DPC extras?
- How do I set up zero-touch enrollment when my device reseller is not a zero-touch partner?
- What happens if a device is uploaded to zero-touch with the wrong manufacturer?
- The device registered with zero-touch, but doesn’t launch during setup, why?
- Does Android Go support zero-touch?
- Why are my zero-touch devices randomly factory resetting?
- Are employee-owned devices eligible for zero-touch?
- How do I turn off Google Play app collections?
- What’s the recommended way of managing private (in-house) applications?
- Is it possible to deploy app shortcuts to the homescreen of an Android Enterprise device?
- What are AMAPI application roles?
- Is it possible to backup & restore device data on a fully managed device?
- What is Lost Mode on Android Enterprise?
- The Google Play iFrame is missing a feature in my UEM. How do I enable it?
- How do I configure allowlist/blocklist domains for Google Chrome?
- Does Picture-in-Picture work in kiosk (lock task) mode?
- How to configure Chrome managed bookmarks
- Why does Samsung Smart Switch not work on fully managed devices?
- Play Protect blocked my DPC, why?
- Can Google Play Protect remove apps from managed devices without admin approval?
- What is enhanced fraud protection, and can it block enterprise apps?
- Has Play Protect changed how it handles sideloaded apps on managed devices?
- What is Google Play developer verification, and how does it affect enterprise?
- What do Google Play's target API level requirements mean for enterprise?
- Does AMAPI support direct APK installation?
- Why can't I find apps in managed Google Play after approving them?
- Are Google Play System Updates managed by Android Enterprise system update policies?
- What enterprise features are new in Android 15?
- Can I purchase paid apps through managed Google Play?
- Can I control default applications through AMAPI?
- Why is my kiosk app UI broken after updating to Android 15?
- Why are managed Google Play apps stuck on pending?
- Why is work profile enrolment failing?
- How do app updates work in managed Google Play?
- Why don't managed configurations work with app tracks?
- How do I prevent users from escaping kiosk (lock task) mode?
- How do I manage credential providers and passkeys on managed devices?
- How does conditional access work with Android Enterprise?
- How does cross-profile data sharing work in a work profile?
- What are the AMAPI device quota limits?
- What is the key attestation root certificate change in 2026?
- Can I rename my managed Google Play organisation?
- How do I manage generative AI apps and features on managed devices?