Contents
Docs
General
- Introduction
- Android versions matrix
- What is Android Enterprise?
- Android Enterprise feature requests
- Considerations when migrating from device administrator to Android Enterprise
- Upgrading your Android Enterprise binding to a managed Google domain
- What is Android Enterprise Recommended?
- Android Enterprise FAQ
- How to migrate Android devices from one EMM to another
- Android Enterprise device testing
- What is Private Space in Android 15, and how can organisations manage it?
- Why don't all Android devices come with GMS?
- What is Android One?
- What are managed configurations?
- Android Enterprise vs Device Admin: Why DA is no longer suitable
- Considerations for choosing Android in the Enterprise
- Feature spotlight: Android Smartlock
- Android glossary
- Android version evolution graphics
- Infobyte: Device Admin deprecation
- How to submit a device for Android Enterprise Recommended validation
- How to view software version information
- How to capture a bug report and device logs
- Gartner comparison of security controls for mobile devices 2019
Provisioning
- How to become a zero-touch enrolment reseller
- Android Enterprise provisioning methods
- What is Android zero-touch enrolment?
- Android Enterprise zero-touch console administration guide
- Android Enterprise DPC identifier collection
- Android Enterprise provisioning guides
- Android Enterprise zero-touch DPC extras collection
- Infobyte: Android Enterprise deployment scenarios
- Infobyte: Android Enterprise fully managed provisioning methods
- Manual Android Enterprise work-managed QR code generation for MobileIron
Work profile
Fully managed
App management
- Set up Hypergate's Kerberos Authentication on MobileIron Core for Android Enterprise
- Managed Google Play, allowlist or blocklist?
- Considerations when deploying MTD with Android Enterprise
- Why you shouldn't install apps from unknown sources
- What is OEMConfig?
- Create and manage private apps for Android Enterprise
- Create and manage web apps for Android Enterprise
- Using Google Play application tracks with EMM
- How to locate a private Android app assigned to an organisation ID
- How to host enterprise apps outside of Google Play
- The Google Play iFrame app approval flow is deprecated
- Android 13 adds notifications access as a runtime permission
- Android 13 & up restricts permissions when apps are sideloaded
- Android 14 blocks apps targeting old Android versions
- Android minimum target SDK matrix
- Android system app database
- How to resolve common Android app install failures, by error message
FAQ
- Is Android Enterprise supported on uncertified (non-GMS) devices?
- Can apps be sideloaded into the Private Space?
- Is Private Space supported on fully managed devices?
- Why don't Private Space apps go through VPN?
- How can apps be managed in the Private Space?
- Are Private Space apps visible to enterprise admins?
- Are Private Space applications truly hidden?
- Does Samsung support Android Enterprise?
- Is it possible to manage personal applications on a work profile device?
- Why has USB data access been disabled suddenly?
- What versions of Android support Android Enterprise?
- How to check if an Android device is GMS/Play Protect certified?
- Is it possible to manage eSIM?
- Can I manage APNs through AMAPI?
- Why is my organisation name showing on managed devices?
- Can I route specific apps through 5G network slicing?
- To use Android Enterprise do I need to buy Google Workspace (G Suite) and register my domain?
- What is a managed Google domain, and should I upgrade?
- Is Android Enterprise supported on XR headsets?
- What devices should I buy for my organisation?
- What is the difference between GMS and EDLA certification for enterprise?
- How do Samsung Knox and Android Enterprise policies interact?
- If Android Enterprise is supported from Lollipop, why is Marshmallow often mentioned instead?
- What’s the difference between Device Admin and Android Enterprise?
- What is the Android Enterprise bind?
- Can I change the account I used to bind Android Enterprise?
- Is it possible to bind Android Enterprise with multiple EMMs using one account?
- How do I remove the Android Enterprise bind from my current EMM?
- How do I choose an EMM for Android Enterprise?
- What network requirements does Android Enterprise have?
- What is Android Enterprise Recommended?
- My AER device doesn’t work properly with Android Enterprise, what should I do?
- What is Advanced Protection, and can it be managed?
- Is Android One better than AER? (Or the other way around?)
- How do I configure Google Workspace domains for provisioning?
- What’s the best provisioning method?
- What’s the difference between allow adding accounts vs allow configure credentials?
- Is it possible to utilise multiple VPN connections within a profile?
- Is it possible to utilise a single VPN connection across the entire device?
- Does Android support Kerberos natively?
- What’s the difference between device based accounts and user based accounts?
- How do I manage the new notifications runtime permission in Android 13?
- Can organisations see applications outside of the work profile?
- What can my employer see on my personal device with a work profile?
- What happens to my data when the work profile is removed?
- What is the difference between MAM and work profiles for BYOD?
- Can organisations deploy applications to the parent profile in a work profile deployment?
- Why does the work profile drain my battery?
- Why are my work profile notifications delayed or missing?
- Is it possible to migrate from DA to AE work profile without a re-enrol?
- Can I turn off my work profile?
- What is a work challenge?
- Enrolment failed but the work profile was created. How do I remove it?
- Why can’t I install or uninstall apps on my managed device?
- How can I provision a fully managed device?
- Is it possible to “retire” (or enterprise wipe) a fully managed device?
- What is RCS archival, and which devices support it?
- Devices factory reset as soon as they’re enrolled, why?
- Is Factory Reset Protection enabled on fully managed devices?
- What is the difference between FRP and Enterprise FRP?
- Is it possible to migrate fully managed devices between EMM solutions?
- How has COPE changed in Android 11?
- Does Intune support COPE?
- Can organisations see applications outside of the work profile on a COPE device?
- Does Android Enterprise support Wear OS?
- Can organisations deploy applications to the parent profile in a COPE deployment?
- Is it possible to migrate from fully managed to COPE without a factory reset?
- How should system applications be handled on a COPE device?
- What OEMs currently support zero-touch?
- Where are zero-touch resellers located?
- Does zero-touch cost anything?
- Does Android Auto work on fully managed devices?
- Is an EMM still required with zero-touch?
- What is the content protection policy in AMAPI?
- What happens if a fully set up device is added to the zero-touch console?
- What happens if a user starts setting up a device before the zero-touch config is applied?
- What happens if a zero-touch config is removed from an enrolled device?
- My AMAPI project returns a usage limit error, why?
- Can I add/remove users on a fully managed device?
- What happens if a new config for a different EMM or server is applied to an enrolled device?
- How can I access a Wi-Fi captive portal when devices are in Kiosk?
- What happens if a zero-touch assigned device is reset?
- What is Device Trust from Android Enterprise?
- Why does zero-touch or KME not trigger after a factory reset on Android 15+?
- What happens if a device is unregistered from the zero-touch console?
- What enterprise features are new in Android 16?
- What is Identity Check on Android?
- Can a device be OTA managed from the zero-touch console?
- What happens when a managed device receives a major Android update?
- Can I migrate devices from a custom DPC to AMAPI?
- What enterprise features are new in Android 17?
- Avoiding configuration issues in Google Workspace with GEM & 3rd party EMM
- What is the difference between AMAPI and a custom DPC?
- Can I pin a specific OS or app version on managed devices?
- Does enrolling via zero-touch slow down or cause any delay to the setup process while it’s retrieving the zero-touch config?
- What happens if my Android Enterprise bind account is disabled or deleted?
- What is the AMAPI MCP server?
- How do I manage runtime permissions on managed Android devices?
- Can I manage Private DNS settings through AMAPI?
- What deployment scenario will a zero-touch device enrol under?
- Why does zero-touch require so much touching?
- Can I set Device Owner without a factory reset?
- Can anyone add a device to the zero-touch console?
- Is it possible for an organisation to add previously-purchased devices to zero-touch?
- Can a MADA device be converted to EDLA?
- Can anyone remove a device from the zero-touch console?
- Does Samsung support zero-touch?
- Is it possible to set a zero-touch default configuration?
- Is it possible to bulk update zero-touch devices?
- Is it possible to change zero-touch resellers?
- Are all zero-touch devices Android Enterprise Recommended?
- What are DPC extras?
- What should I put in DPC extras?
- How do I set up zero-touch enrollment when my device reseller is not a zero-touch partner?
- What happens if a device is uploaded to zero-touch with the wrong manufacturer?
- The device registered with zero-touch, but doesn’t launch during setup, why?
- Does Android Go support zero-touch?
- Why are my zero-touch devices randomly factory resetting?
- Are employee-owned devices eligible for zero-touch?
- How do I turn off Google Play app collections?
- What’s the recommended way of managing private (in-house) applications?
- Is it possible to deploy app shortcuts to the homescreen of an Android Enterprise device?
- What are AMAPI application roles?
- Is it possible to backup & restore device data on a fully managed device?
- What is Lost Mode on Android Enterprise?
- The Google Play iFrame is missing a feature in my UEM. How do I enable it?
- How do I configure allowlist/blocklist domains for Google Chrome?
- Does Picture-in-Picture work in kiosk (lock task) mode?
- How to configure Chrome managed bookmarks
- Why does Samsung Smart Switch not work on fully managed devices?
- Play Protect blocked my DPC, why?
- Can Google Play Protect remove apps from managed devices without admin approval?
- What is enhanced fraud protection, and can it block enterprise apps?
- Has Play Protect changed how it handles sideloaded apps on managed devices?
- What is Google Play developer verification, and how does it affect enterprise?
- What do Google Play's target API level requirements mean for enterprise?
- Does AMAPI support direct APK installation?
- Why can't I find apps in managed Google Play after approving them?
- Are Google Play System Updates managed by Android Enterprise system update policies?
- What enterprise features are new in Android 15?
- Can I purchase paid apps through managed Google Play?
- Can I control default applications through AMAPI?
- Why is my kiosk app UI broken after updating to Android 15?
- Why are managed Google Play apps stuck on pending?
- Why is work profile enrolment failing?
- How do app updates work in managed Google Play?
- Why don't managed configurations work with app tracks?
- How do I prevent users from escaping kiosk (lock task) mode?
- How do I manage credential providers and passkeys on managed devices?
- How does conditional access work with Android Enterprise?
- How does cross-profile data sharing work in a work profile?
- What are the AMAPI device quota limits?
- What is the key attestation root certificate change in 2026?
- Can I rename my managed Google Play organisation?
- How do I manage generative AI apps and features on managed devices?
LXD, ZFS and bridged networking on Ubuntu 16.04 LTS+
Contents
Network changes in Ubuntu 17.10+
#This guide has been updated for netplan, introduced in 17.10. Please test the configuration and let me know if you have any issues with it.
LXD works perfectly fine with a directory-based storage backend, but both speed and reliability are greatly improved when ZFS is used instead. 16.04 LTS saw the first officially supported release of ZFS for Ubuntu and having just set up a fresh LXD host on Elastichosts utilising both ZFS and bridged networking, I figured it’d be a good time to document it.
In this article I’ll walk through the installation of LXD, ZFS and Bridge-Utils on Ubuntu 16.04 and configure LXD to use either a physical ZFS partition or loopback device combined with a bridged networking setup allowing for containers to pick up IP addresses via DHCP on the (v)LAN rather than a private subnet.
Before we begin
#This walkthrough assumes you already have a Ubuntu 16.04 server host set up and ready to work with. If you do not, please download and install it now.
You’ll also need a spare disk, partition or adequate space on-disk to support a loopback file for your ZFS filesystem.
Finally this guide is reliant on the command line and some familiarity with the CLI would be advantageous, though the objective is to make this a copy & paste article as much as possible.
Part 1: Installation
#To get started, let’s install our packages. They can all be installed with one command as follows:
sudo apt-get install lxd zfsutils-linux bridge-utils
However for this I will output the commands and the result for each package individually:
sudo apt-get install lxd
Reading package lists... Done
Building dependency tree
Reading state information... Done
lxd is already the newest version (2.0.0-0ubuntu4).
0 upgraded, 0 newly installed, 0 to remove and 0 not upgraded.
sudo apt-get install zfsutils-linux
Reading package lists... Done
Building dependency tree
Reading state information... Done
[...]
The following NEW packages will be installed:
  libnvpair1linux libuutil1linux libzfs2linux libzpool2linux zfs-doc zfs-zed
  zfsutils-linux
0 upgraded, 7 newly installed, 0 to remove and 16 not upgraded.
Need to get 884 kB of archives.
[...]
Setting up zfs-doc (0.6.5.6-0ubuntu8) ...
Setting up libuutil1linux (0.6.5.6-0ubuntu8) ...
Setting up libnvpair1linux (0.6.5.6-0ubuntu8) ...
Setting up libzpool2linux (0.6.5.6-0ubuntu8) ...
Setting up libzfs2linux (0.6.5.6-0ubuntu8) ...
Setting up zfsutils-linux (0.6.5.6-0ubuntu8) ...
[...]
Setting up zfs-zed (0.6.5.6-0ubuntu8) ...
zed.service is a disabled or a static unit, not starting it.
Processing triggers for libc-bin (2.23-0ubuntu3) ...
Processing triggers for ureadahead (0.100.0-19) ...
Processing triggers for systemd (229-4ubuntu4) ...
sudo apt-get install bridge-utils
Reading package lists... Done
Building dependency tree
Reading state information... Done
The following NEW packages will be installed:
  bridge-utils
0 upgraded, 1 newly installed, 0 to remove and 16 not upgraded.
Need to get 28.6 kB of archives.
[...]
Preparing to unpack .../bridge-utils_1.5-9ubuntu1_amd64.deb ...
Unpacking bridge-utils (1.5-9ubuntu1) ...
Processing triggers for man-db (2.7.5-1) ...
Setting up bridge-utils (1.5-9ubuntu1) ...
You’ll notice I’ve installed LXD, ZFS and bridge utils. LXD should be installed by default on any 16.04 host as is shown by the output above, however should there be any updates this will bring them down before we begin.
ZFS and bridge utils are not installed by default; ZFS needs to be installed to run our storage backend and bridge utils is required in order for our bridged interface to work.
Part 2: Configuration
#With the relevant packages installed, we can now move on to configuration. We’ll start by configuring the bridge as before this is complete we won’t be able to obtain DHCP addresses for containers within LXD.
Setting up the bridge
#Legacy ifupdown
#We’ll begin by opening /etc/network/interfaces in a text editor. I like vim:
sudo vim /etc/network/interfaces
# The loopback network interface
auto lo
iface lo inet loopback

# The primary network interface
auto eth0
iface eth0 inet dhcp
This is the default interfaces file. What we’ll do here is add a new bridge named br0. The simplest edit to make to this file is as follows:
# The loopback network interface
auto lo
iface lo inet loopback

# The primary network interface
auto br0
iface br0 inet dhcp
	bridge_ports eth0

iface eth0 inet manual
This will set the eth0 interface to manual and create a new bridge that piggybacks directly off it.
If you wish to create a static interface while you’re editing this file, the following may help you:
# The loopback network interface
auto lo
iface lo inet loopback

# The primary network interface
auto br0
iface br0 inet static
        address 192.168.0.44
        netmask 255.255.255.0
        network 192.168.0.0
        broadcast 192.168.0.255
        gateway 192.168.0.1
        # dns-* options are implemented by the resolvconf package, if installed
        dns-nameservers 8.8.8.8 8.8.4.4 #google-dns
        dns-search localdomain.local #optional-line
        # bridge options
        bridge_ports eth0
iface eth0 inet manual
Following any edits, it’s a good idea to restart the interfaces to force the changes to take place. Obviously if you’re connected via SSH this will disconnect your session. You’ll need to have physical access to the machine/VM.
sudo ifdown eth0 && sudo ifup eth0 && sudo ifup br0
Modern netplan
#We’ll begin by opening /etc/netplan/01-netcfg.yaml in a text editor. I like vim:
# This file is generated from information provided by
# the datasource. Changes to it will not persist across an instance.
# To disable cloud-init's network configuration capabilities, write a file
# /etc/cloud/cloud.cfg.d/99-disable-network-config.cfg with the following:
# network: {config: disabled}
network:
 version: 2
 renderer: networkd
 ethernets:
   eth0:
     dhcp4: false
 bridges:
   br0:
     interfaces: [eth0]
     dhcp4: false
     addresses: [192.168.1.99/24]
     gateway4: 192.168.1.1
     nameservers:
       addresses: [1.1.1.1,8.8.8.8]
     parameters:
       forward-delay: 0
All of the above bolded lines have been added/modified for a static IP bridge. Edit to suit your environment and then run the following to apply changes:
sudo netplan apply
Running ifconfig on the CLI will now confirm the changes have been applied:
jason@ubuntu-lxdzfs:~$ ifconfig
<b>br0</b>       Link encap:Ethernet  HWaddr 00:0c:29:2f:cd:30
          inet addr:192.168.0.44  Bcast:192.168.0.255  Mask:255.255.255.0
          inet6 addr: fe80::20c:29ff:fe2f:cd30/64 Scope:Link
          UP BROADCAST RUNNING MULTICAST  MTU:1500  Metric:1
          RX packets:2235187 errors:0 dropped:37359 overruns:0 frame:0
          TX packets:111487 errors:0 dropped:0 overruns:0 carrier:0
          collisions:0 txqueuelen:1000
          RX bytes:2108302272 (2.1 GB)  TX bytes:8296995 (8.2 MB)

eth0      Link encap:Ethernet  HWaddr 00:0c:29:2f:cd:30
          inet6 addr: fe80::20c:29ff:fe2f:cd30/64 Scope:Link
          UP BROADCAST RUNNING MULTICAST  MTU:1500  Metric:1
          RX packets:161568870 errors:0 dropped:0 overruns:0 frame:0
          TX packets:132702 errors:0 dropped:0 overruns:0 carrier:0
          collisions:0 txqueuelen:1000
          RX bytes:185204051222 (185.2 GB)  TX bytes:23974566 (23.9 MB)

[...]
Configuring LXD & ZFS
#With the bridge up and running we can now begin to configure LXD. Before we start setting up containers, LXD requests we run sudo lxd init to configure the package. As part of this, we’ll be selecting our newly created bridge for network connectivity and configuring ZFS as LXD will take care of both during setup.
For this guide I’ll be using a dedicated hard drive for the ZFS storage backend, though the same procedure can be used for a dedicated partition if you don’t have a spare drive handy. For those wishing to use a loopback file for testing, the procedure is slightly different and will be addressed below.
Find the disk/partition to be used
#First we’ll run sudo fdisk -l to list the available disks & partitions on the server, here’s a relevant snippet of the output I get:
Disk /dev/sda: 20 GiB, 21474836480 bytes, 41943040 sectors
[...]

Device     Boot    Start      End  Sectors  Size Id Type
/dev/sda1  *        2048 36132863 36130816 17.2G 83 Linux
/dev/sda2       36134910 41940991  5806082  2.8G  5 Extended
/dev/sda5       36134912 41940991  5806080  2.8G 82 Linux swap / Solaris


Disk /dev/sdb: 20 GiB, 21474836480 bytes, 41943040 sectors
[...]

Device     Boot    Start      End  Sectors  Size Id Type
/dev/sdb1           2048 41940991 41938944  20G  83 Linux
Make a note of the partition or drive to be used. In this example we’ll use partition sdb1 on disk /dev/sdb
Be aware
#If your disk/partition is currently formatted and mounted on the system, it will need to be unmounted with sudo umount /path/to/mountpoint before continuing, or LXD will error during configuration.
Additionally if there’s an fstab entry this will need to be removed before continuing, otherwise you’ll see mount errors when you next reboot.
Configure LXD
#Changes to bridge configuration
#As of LXD 2.5 there have been a few changes. If installing a version of LXD under 2.5 please continue below, however for 2.5 and above in order to use the pre-configured bridge select No for Do you want to configure the LXD bridge (yes/no)? then see Configure LXD bridge (2.5+) below for details of adding the bridge manually after this.
Check the version of LXD by running sudo lxc info.
Start the configuration of LXD by running sudo lxd init
jason@ubuntu-lxd-tut:~$ sudo lxd init
Name of the storage backend to use (dir or zfs): zfs
Create a new ZFS pool (yes/no)? yes
Name of the new ZFS pool: lxd
Would you like to use an existing block device (yes/no)? yes
Path to the existing block device: /dev/sdb1
Would you like LXD to be available over the network (yes/no)? no
Do you want to configure the LXD bridge (yes/no)? yes
Warning: Stopping lxd.service, but it can still be activated by:
  lxd.socket
LXD has been successfully configured.
Let’s break the above options down:
Name of the storage backend to use (dir or zfs): zfs
Here we’re defining ZFS as our storage backend of choice. The other option, DIR, is a flat-file storage option that places all containers on the host filesystem under /var/lib/lxd/containers/ (though the ZFS partition is transparently mounted under the same path and so accessed equally as easily). It doesn’t benefit from features such as compression and copy-on-write however, so the performance of the containers using the DIR backend simply won’t be as good.
Create a new ZFS pool (yes/no)? yes
Name of the new ZFS pool: lxd
Here we’re creating a brand new ZFS pool for LXD and giving it the name of “lxd”. We could also choose to use an existing pool if one were to exist, though as we left ZFS unconfigured it does not apply here.
Would you like to use an existing block device (yes/no)? yes
Path to the existing block device: /dev/sdb1
Here we’re opting to use a physical partition rather than a loopback device, then providing the physical location of said partition.
Would you like LXD to be available over the network (yes/no)? no
It’s possible to connect to LXD from other LXD servers or via the API from a browser (see https://linuxcontainers.org/lxd/try-it/ for an example of this).
As this is a simple installation we won’t be utilising this functionality and it is as such left unconfigured. Should we wish to enable it at a later date, we can run:
lxc config set core.https_address [::]
lxc config set core.trust_password some-secret-string
Where some-secret-string is a secure password that’ll be required by other LXD servers wishing to connect in order to admin the LXD host or retried non-public published images.
Do you want to configure the LXD bridge (yes/no)? yes
Here we tell LXD to use our already-preconfigured bridge. This opens a new workflow as follows:
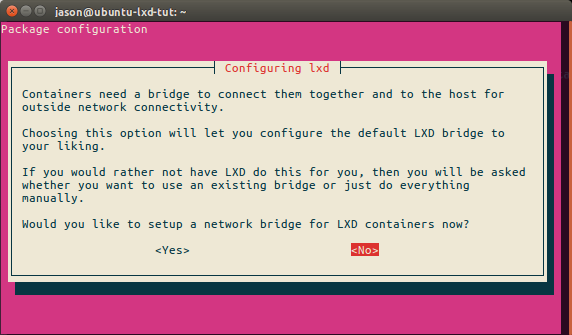 We don’t want LXD to create a new bridge for us, so we’ll select no here.
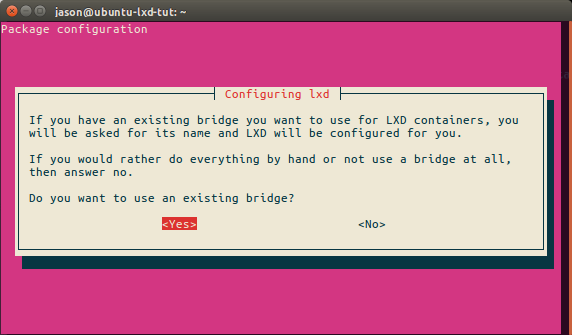 LXD now knows we may have our own bridge already set up, so we’ll select yes in order to declare it.
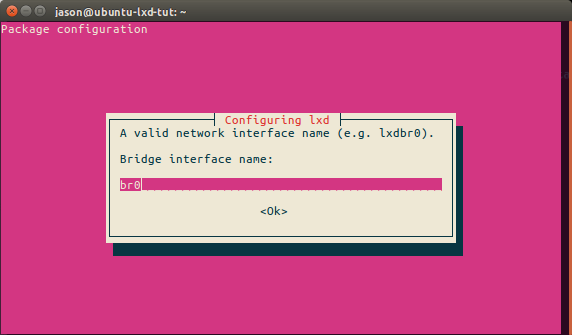 Finally we’ll input the bridge name and select OK. LXD will now use this bridge.
And with that, LXD will finish configuration and ready itself for use.
Configure LXD bridge (2.5+)
#In version 2.5, the above purple bridge workflow has been retired in favour of the new lxc network command.
With lxd init complete above, add the br0 interface to the default profile with:
lxc network attach-profile br0 default eth0
If by accident the lxdbr0 interface was configured, it must be first detached from the default profile with:
lxc network detach-profile lxdbr0 default eth0
It’ll be obvious if this needs to be done as running lxc network attach-profile br0 default eth0 will result in the error error: device already exists.
With that complete, LXD will now successfully use the pre-configured bridge.
Configuring LXD with a ZFS loopback device
#Run sudo lxd init as above, but use the following options instead.
Name of the storage backend to use (dir or zfs): zfs
Create a new ZFS pool (yes/no)? yes
Name of the new ZFS pool: lxd-loop
Would you like to use an existing block device (yes/no)? no
Size in GB of the new loop device (1GB minimum): 20
The size in GB of the ZFS partition is important, we don’t want to run out of space any time soon. Although ZFS partitions may be resized, it’s better to be a little generous now and not have to worry about reconfiguring it later.
Increasing file and inode limits
#Since it’s entirely possible we may in the future wish to run multiple LXD containers, it’s a good idea to already increase the number of open files and inode limits, this will prevent the dreaded “too many open files” errors which commonly occur with container solutions.
For the inode limits, open the sysctl.conf file as follows:
sudo vim /etc/sysctl.conf
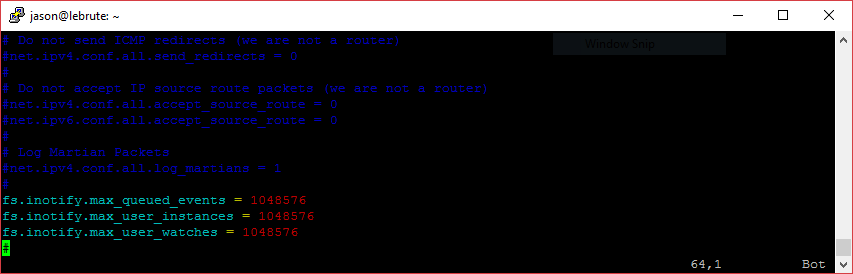
Now add the following lines, as recommended by the LXD project
fs.inotify.max_queued_events = 1048576
fs.inotify.max_user_instances = 1048576
fs.inotify.max_user_watches = 1048576
It should look as follows:
After saving the file we’ll need to reboot, but not yet as we’ll also configure the open file limits.
Open the limits.conf file as follows:
sudo vim /etc/security/limits.conf
Now add the following lines. 100K should be enough:
* soft nofile 100000
* hard nofile 100000
It should look as follows:

Once the server is rebooted (this is important!) the new limits will apply and we’ll have future-proofed the server for now.
sudo reboot
Part 3: Test
#With our bridge set up, our ZFS storage backend created and LXD fully configured, it’s time to test everything is working as it should be.
We’ll first get a quick overview of our ZFS storage pool using sudo zpool list lxd
jason@ubuntu-lxd-tut:~$ sudo zpool list lxd
NAME   SIZE  ALLOC   FREE  EXPANDSZ   FRAG    CAP  DEDUP  HEALTH  ALTROOT
lxd   19.9G   646M  19.2G         -     2%     3%  1.00x  ONLINE  -
With ZFS looking fine, we’ll run a simple lxc info to generate our client certificate and verify the configuration we’ve chosen for LXD:
jason@ubuntu-lxd-tut:~$ lxc info
Generating a client certificate. This may take a minute...

apicompat: 0
auth: trusted
environment:
  addresses: []
  architectures:
  - x86_64
  - i686
  certificate: |
    -----BEGIN CERTIFICATE-----
    [...]
    -----END CERTIFICATE-----
  driver: lxc
  driverversion: 2.0.0
  kernel: Linux
  kernelarchitecture: x86_64
  kernelversion: 4.4.0-21-generic
  server: lxd
  serverpid: 5135
  serverversion: 2.0.0
  storage: zfs
  storageversion: "5"
config:
  storage.zfs_pool_name: lxd
public: false
It would appear the storage backend is correctly using our ZFS pool: “lxd”. If we now take a look at the default profile using:
lxc profile show default
We should see LXD using br0 as the default container eth0 interface:
jason@ubuntu-lxd-tut:~$ lxc profile show default
name: default
config: {}
description: Default LXD profile
devices:
  eth0:
    name: eth0
    nictype: bridged
    parent: br0
    type: nic
Success! The only thing left to do now is launch a container.
We can use the official Ubuntu image repo and spin up a Xenial container with the alias xen1 using the command:
lxc launch ubuntu:xenial xen1
Which should return an output like this:
jason@ubuntu-lxd-tut:~$ lxc launch ubuntu:xenial xen1
Creating xen1
Retrieving image: 100%
Starting xen1
Now, we can use lxc list to get an overview of all containers including their IP addresses:
jason@ubuntu-lxd-tut:~$ lxc list
+------+---------+----------------------+------+------------+-----------+
| NAME |  STATE  |        IPV4          | IPV6 |    TYPE    | SNAPSHOTS |
+------+---------+----------------------+------+------------+-----------+
| xen1 | RUNNING | 192.168.0.197 (eth0) |      | PERSISTENT | 0         |
+------+---------+----------------------+------+------------+-----------+
We can see the xen1 container has picked up an IP from our DHCP server on the LAN, which is exactly what we want.
Finally, we can use lxc exec xen1 bash to gain CLI access to the container we’ve just launched:
jason@ubuntu-lxd-tut:~$ lxc exec xen1 bash
root@xen1:~#
Conclusion
#While a little long-winded, setting up LXD with a ZFS storage backend and utilising a bridged interface for connecting containers directly to the LAN isn’t overly difficult, and it’s only gotten easier as LXD has matured to version 2.0.
Are you brand new to LXD? I thoroughly recommend you take a look at LXD developer Stéphane Graber’s incredible LXD blog series to get up to speed.
Docs
General
- Introduction
- Android versions matrix
- What is Android Enterprise?
- Android Enterprise feature requests
- Considerations when migrating from device administrator to Android Enterprise
- Upgrading your Android Enterprise binding to a managed Google domain
- What is Android Enterprise Recommended?
- Android Enterprise FAQ
- How to migrate Android devices from one EMM to another
- Android Enterprise device testing
- What is Private Space in Android 15, and how can organisations manage it?
- Why don't all Android devices come with GMS?
- What is Android One?
- What are managed configurations?
- Android Enterprise vs Device Admin: Why DA is no longer suitable
- Considerations for choosing Android in the Enterprise
- Feature spotlight: Android Smartlock
- Android glossary
- Android version evolution graphics
- Infobyte: Device Admin deprecation
- How to submit a device for Android Enterprise Recommended validation
- How to view software version information
- How to capture a bug report and device logs
- Gartner comparison of security controls for mobile devices 2019
Provisioning
- How to become a zero-touch enrolment reseller
- Android Enterprise provisioning methods
- What is Android zero-touch enrolment?
- Android Enterprise zero-touch console administration guide
- Android Enterprise DPC identifier collection
- Android Enterprise provisioning guides
- Android Enterprise zero-touch DPC extras collection
- Infobyte: Android Enterprise deployment scenarios
- Infobyte: Android Enterprise fully managed provisioning methods
- Manual Android Enterprise work-managed QR code generation for MobileIron
Work profile
Fully managed
App management
- Set up Hypergate's Kerberos Authentication on MobileIron Core for Android Enterprise
- Managed Google Play, allowlist or blocklist?
- Considerations when deploying MTD with Android Enterprise
- Why you shouldn't install apps from unknown sources
- What is OEMConfig?
- Create and manage private apps for Android Enterprise
- Create and manage web apps for Android Enterprise
- Using Google Play application tracks with EMM
- How to locate a private Android app assigned to an organisation ID
- How to host enterprise apps outside of Google Play
- The Google Play iFrame app approval flow is deprecated
- Android 13 adds notifications access as a runtime permission
- Android 13 & up restricts permissions when apps are sideloaded
- Android 14 blocks apps targeting old Android versions
- Android minimum target SDK matrix
- Android system app database
- How to resolve common Android app install failures, by error message
FAQ
- Is Android Enterprise supported on uncertified (non-GMS) devices?
- Can apps be sideloaded into the Private Space?
- Is Private Space supported on fully managed devices?
- Why don't Private Space apps go through VPN?
- How can apps be managed in the Private Space?
- Are Private Space apps visible to enterprise admins?
- Are Private Space applications truly hidden?
- Does Samsung support Android Enterprise?
- Is it possible to manage personal applications on a work profile device?
- Why has USB data access been disabled suddenly?
- What versions of Android support Android Enterprise?
- How to check if an Android device is GMS/Play Protect certified?
- Is it possible to manage eSIM?
- Can I manage APNs through AMAPI?
- Why is my organisation name showing on managed devices?
- Can I route specific apps through 5G network slicing?
- To use Android Enterprise do I need to buy Google Workspace (G Suite) and register my domain?
- What is a managed Google domain, and should I upgrade?
- Is Android Enterprise supported on XR headsets?
- What devices should I buy for my organisation?
- What is the difference between GMS and EDLA certification for enterprise?
- How do Samsung Knox and Android Enterprise policies interact?
- If Android Enterprise is supported from Lollipop, why is Marshmallow often mentioned instead?
- What’s the difference between Device Admin and Android Enterprise?
- What is the Android Enterprise bind?
- Can I change the account I used to bind Android Enterprise?
- Is it possible to bind Android Enterprise with multiple EMMs using one account?
- How do I remove the Android Enterprise bind from my current EMM?
- How do I choose an EMM for Android Enterprise?
- What network requirements does Android Enterprise have?
- What is Android Enterprise Recommended?
- My AER device doesn’t work properly with Android Enterprise, what should I do?
- What is Advanced Protection, and can it be managed?
- Is Android One better than AER? (Or the other way around?)
- How do I configure Google Workspace domains for provisioning?
- What’s the best provisioning method?
- What’s the difference between allow adding accounts vs allow configure credentials?
- Is it possible to utilise multiple VPN connections within a profile?
- Is it possible to utilise a single VPN connection across the entire device?
- Does Android support Kerberos natively?
- What’s the difference between device based accounts and user based accounts?
- How do I manage the new notifications runtime permission in Android 13?
- Can organisations see applications outside of the work profile?
- What can my employer see on my personal device with a work profile?
- What happens to my data when the work profile is removed?
- What is the difference between MAM and work profiles for BYOD?
- Can organisations deploy applications to the parent profile in a work profile deployment?
- Why does the work profile drain my battery?
- Why are my work profile notifications delayed or missing?
- Is it possible to migrate from DA to AE work profile without a re-enrol?
- Can I turn off my work profile?
- What is a work challenge?
- Enrolment failed but the work profile was created. How do I remove it?
- Why can’t I install or uninstall apps on my managed device?
- How can I provision a fully managed device?
- Is it possible to “retire” (or enterprise wipe) a fully managed device?
- What is RCS archival, and which devices support it?
- Devices factory reset as soon as they’re enrolled, why?
- Is Factory Reset Protection enabled on fully managed devices?
- What is the difference between FRP and Enterprise FRP?
- Is it possible to migrate fully managed devices between EMM solutions?
- How has COPE changed in Android 11?
- Does Intune support COPE?
- Can organisations see applications outside of the work profile on a COPE device?
- Does Android Enterprise support Wear OS?
- Can organisations deploy applications to the parent profile in a COPE deployment?
- Is it possible to migrate from fully managed to COPE without a factory reset?
- How should system applications be handled on a COPE device?
- What OEMs currently support zero-touch?
- Where are zero-touch resellers located?
- Does zero-touch cost anything?
- Does Android Auto work on fully managed devices?
- Is an EMM still required with zero-touch?
- What is the content protection policy in AMAPI?
- What happens if a fully set up device is added to the zero-touch console?
- What happens if a user starts setting up a device before the zero-touch config is applied?
- What happens if a zero-touch config is removed from an enrolled device?
- My AMAPI project returns a usage limit error, why?
- Can I add/remove users on a fully managed device?
- What happens if a new config for a different EMM or server is applied to an enrolled device?
- How can I access a Wi-Fi captive portal when devices are in Kiosk?
- What happens if a zero-touch assigned device is reset?
- What is Device Trust from Android Enterprise?
- Why does zero-touch or KME not trigger after a factory reset on Android 15+?
- What happens if a device is unregistered from the zero-touch console?
- What enterprise features are new in Android 16?
- What is Identity Check on Android?
- Can a device be OTA managed from the zero-touch console?
- What happens when a managed device receives a major Android update?
- Can I migrate devices from a custom DPC to AMAPI?
- What enterprise features are new in Android 17?
- Avoiding configuration issues in Google Workspace with GEM & 3rd party EMM
- What is the difference between AMAPI and a custom DPC?
- Can I pin a specific OS or app version on managed devices?
- Does enrolling via zero-touch slow down or cause any delay to the setup process while it’s retrieving the zero-touch config?
- What happens if my Android Enterprise bind account is disabled or deleted?
- What is the AMAPI MCP server?
- How do I manage runtime permissions on managed Android devices?
- Can I manage Private DNS settings through AMAPI?
- What deployment scenario will a zero-touch device enrol under?
- Why does zero-touch require so much touching?
- Can I set Device Owner without a factory reset?
- Can anyone add a device to the zero-touch console?
- Is it possible for an organisation to add previously-purchased devices to zero-touch?
- Can a MADA device be converted to EDLA?
- Can anyone remove a device from the zero-touch console?
- Does Samsung support zero-touch?
- Is it possible to set a zero-touch default configuration?
- Is it possible to bulk update zero-touch devices?
- Is it possible to change zero-touch resellers?
- Are all zero-touch devices Android Enterprise Recommended?
- What are DPC extras?
- What should I put in DPC extras?
- How do I set up zero-touch enrollment when my device reseller is not a zero-touch partner?
- What happens if a device is uploaded to zero-touch with the wrong manufacturer?
- The device registered with zero-touch, but doesn’t launch during setup, why?
- Does Android Go support zero-touch?
- Why are my zero-touch devices randomly factory resetting?
- Are employee-owned devices eligible for zero-touch?
- How do I turn off Google Play app collections?
- What’s the recommended way of managing private (in-house) applications?
- Is it possible to deploy app shortcuts to the homescreen of an Android Enterprise device?
- What are AMAPI application roles?
- Is it possible to backup & restore device data on a fully managed device?
- What is Lost Mode on Android Enterprise?
- The Google Play iFrame is missing a feature in my UEM. How do I enable it?
- How do I configure allowlist/blocklist domains for Google Chrome?
- Does Picture-in-Picture work in kiosk (lock task) mode?
- How to configure Chrome managed bookmarks
- Why does Samsung Smart Switch not work on fully managed devices?
- Play Protect blocked my DPC, why?
- Can Google Play Protect remove apps from managed devices without admin approval?
- What is enhanced fraud protection, and can it block enterprise apps?
- Has Play Protect changed how it handles sideloaded apps on managed devices?
- What is Google Play developer verification, and how does it affect enterprise?
- What do Google Play's target API level requirements mean for enterprise?
- Does AMAPI support direct APK installation?
- Why can't I find apps in managed Google Play after approving them?
- Are Google Play System Updates managed by Android Enterprise system update policies?
- What enterprise features are new in Android 15?
- Can I purchase paid apps through managed Google Play?
- Can I control default applications through AMAPI?
- Why is my kiosk app UI broken after updating to Android 15?
- Why are managed Google Play apps stuck on pending?
- Why is work profile enrolment failing?
- How do app updates work in managed Google Play?
- Why don't managed configurations work with app tracks?
- How do I prevent users from escaping kiosk (lock task) mode?
- How do I manage credential providers and passkeys on managed devices?
- How does conditional access work with Android Enterprise?
- How does cross-profile data sharing work in a work profile?
- What are the AMAPI device quota limits?
- What is the key attestation root certificate change in 2026?
- Can I rename my managed Google Play organisation?
- How do I manage generative AI apps and features on managed devices?